Long are the days when computers taking a whole room. were norm. Nowadays a fully functional computer can be fitted into a palm. The current technological possibilities benefit every industry. Cybersecurity is not an exception. If dedicated expensive hardware was needed back in the days to have a “hacking station”, today a microcomputer, costing several tens of dollars, can fulfill the basic needs for pentesting. This article covers how to install Kali Linux on Raspberry Pi 4, and how to create a mobile pentesting station.
Having Kali Linux on Raspberry Pi 4 has at least a few advantages:
- It is cost efficient – saying that it is cheap might not be correct, as RPI might cost differently across the world, and with the taxes, the price adds up. However, what’s true is that Raspberry Pi is worth every dollar as it decent power for the spent dollar. It is definitely cheaper than buying a laptop.
- Small and portable hacking station – having a dedicated device for the Kali Linux is handy. But what is more convenient, is having a device with Kali that can fit your pocket. This means you don’t have to make a dual boot installation if you use Kali Linux once in a while. You can
Kali Linux on Raspberry Pi 4 is one of the options, and it is definitely not the only one. If you have a decent machine, creating and running a VM on VirtualBox (or VMware) is one of the alternatives.
Although, Kali Linux on VirtualBox or any other hypervisor, comes with its own advantages and disadvantages.
Advantages:
- It is easy to manage (create, delete, restore) virtual machines.
- Easy to configure a virtual network and create a closed cyber lab.
Disadvantages
- If your PC frozes, so does the VM (this is mostly applicable to Linux).
- A decent hardware is needed if you want to run VM and work with your machine at the same time. The system will be even more loaded if you want to run another VM as a target for testing.
Table of Contents
What is Kali Linux?

Kali Linux is a Debian-based distribution, that is made for penetration testers. It contains many ethical hacking tools, has set repositories with additional penetration testing tools, and it all makes the work for the pentester easier. Distribution is created by Offensive Security, a company that is famous in the offensive cybersecurity space.
What kind of pie is Raspberry Pi 4?

If you are new to the IT world, you might be amused trying to understand what cybersecurity has to do with raspberries. So let me make a short introduction. Raspberry Pi is a small microcomputer that is very mobile and universal. Even though it fits the palm, it can perform well, as the newest version of the Raspberry Pi comes with 8 GB of RAM, and quad core, 1.5GHz ARM v8 architecture processor.
Raspberry Pi 4 might come in handy in a situation where you need a separate machine for a specific task. If we talk about using Raspberry Pi for penetration testing, this little device might work as a server that hosts an application that becomes a target for penetration testing purposes. It might host DVWA or any other vulnerable app.
And of course, we can transform it into a small hacking station, by installing Kali Linux on Raspberry Pi. This is why we are here today. However, if you want to install a Kali Linux with full packages and tools, Raspberry Pi might not be fast enough while using them.
The newest version of the RPI, Raspberry Pi 400, comes with a keyboard and mouse. This might be a good choice for the mobile Kali Linux installation.
If it is so powerful, can it replace our computers?
Well, no. Even though it is relatively cheap, compared to the cost of hardware such as laptops, and it does have enough computational resources for a lot of things, it is not a supercomputer.
How to install Kali Linux on Raspberry Pi 4
Before starting out, let’s review what are prerequisites in order to have a Kali Linux on Raspberry Pi 4 hacking station.
Prerequisites
- Raspberry Pi 4. It doesn’t matter if you will use Raspberry Pi 2, 3, or 4. However, keep in mind that you might face some struggles installing Kali Linux on Raspberry Pi 4 8 GB version, as the Kali maintainers had not announced support for the Raspberry Pi 4 8GB version yet. More on this later. Also, an older Raspberry such as 2, has fewer resources and the Kali might lag a little bit on it.
- Depending on your needs, you might need a WiFi module for Raspberry Pi (if you want to use your microcomputer for WiFi network analysis), or a Raspberry Pi case (if you want to have a mobile “hacking station”).
- Micro SD card. You will need at least 8 GB MicroSD card for installing Kali Linux.
- Kali Linux image for Raspberry Pi.
Installation
The installation process consists of a few straightforward steps: downloading an image, writing it into an SD card, booting it on the RPI.
The first step would be to download an image from the official website.

Depending on the device you have, select the installation that works best for you. If you have a version with less than 4 GB RAM, choose the 32-bit version.
You can direct it either directly from web, or from the terminal. Example of getting the 64-bit version:
wget https://images.kali.org/arm-images/kali-linux-2021.1-rpi4-nexmon-64.img.xzAnd after that, you can compare the hash to the provided on the website … just in case:
sha256sum kali-linux-2021.1-rpi4-nexmon-64.img.xzAfter downloading and validating the integrity of the suitable Raspberry Pi Kali Linux image, you will need to flash it to the microSD card. Before that, make sure you have a way to connect microSD card to your machine. Many laptops has SD card reader, otherwise you might need an external SD card reader (like this one).
After you’ve inserted the microSD to your machine, you will need a flasher to transfer the files to your card. There are two popular choices for this purpose:
- Balena Etcher
- Raspberry Pi Imager
However, you can use any program like, it is just that these two are pretty simple and easy to use.
For this tutorial, we will show how to install Kali Linux on Raspberry Pi with Raspberry Pi imager. Process with the Balena Etcher is very intuitive, and you can figure out how it works by following instructions from the app UI.
Moving along, let’s see how we can flash Kali Linux to Raspberry Pi microSD card with Raspberry Pi imager. We can get this software from the official website: https://www.raspberrypi.org/software/.
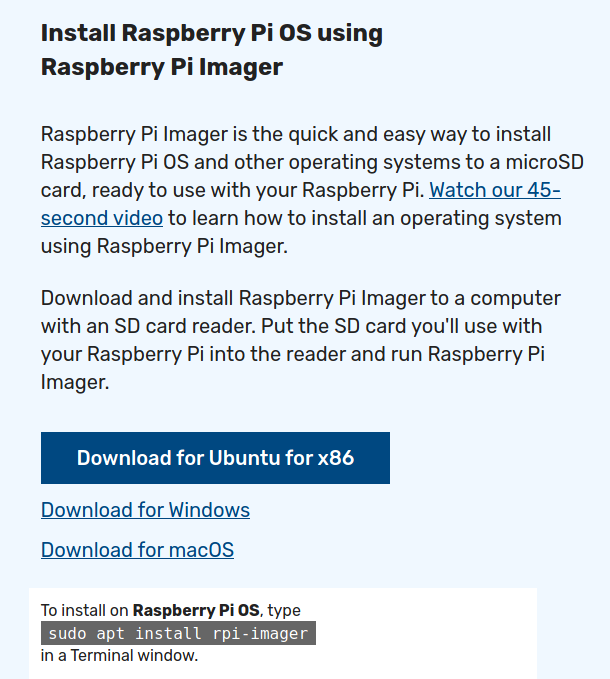
Locate this part on the page and click on the relevant download option, according to your OS. Note that you can get the imager easily on Raspberry Pi OS – sudo apt install rpi-imager. Unfortunately, this would not work on any other distribution as the repository of the imager will not be set.
For the Linux systems, there are two approaches – directly download the imager, or use snap. This is simple as executing snap install rpi-imager command.
For Kali Linux. If you do not have snap, following commands will install it: sudo apt update and sudo apt install snapd. Additionally: sudo systemctl enable –now snapd apparmor, otherwise Snap will not be able to download anything. After that, you should be able to run the imager. If you are getting this: error zsh: command not found: rpi-imager, there is a chance you were not starting it with correctly, with snap: snap run rpi-imager.
Another approach is to manually install the downloaded DEB package of the Raspberry Pi Imager:
sudo dpkg -i imager_1.6.1_amd64.debIn case you got error because of the missing dependencies, you can fix this with:
sudo apt-get -f installAfter this you won’t need to repeat the initial rpi-imager package installation command, It can be start from terminal by executing:
rpi-imagerAgnostic to the method you choose, after starting the Raspberry Pi imager, you should see the main window.
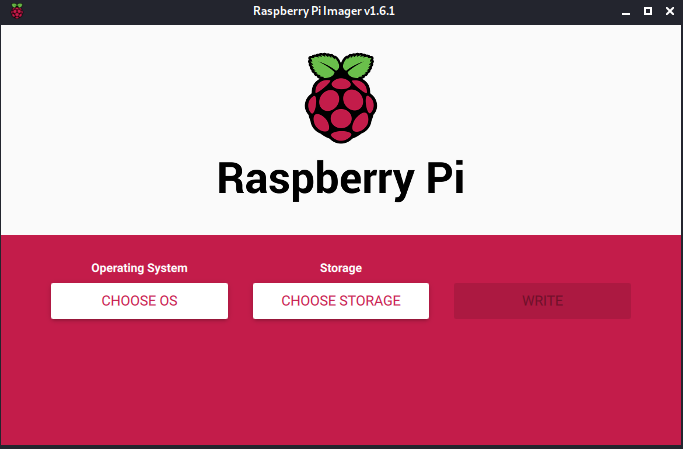
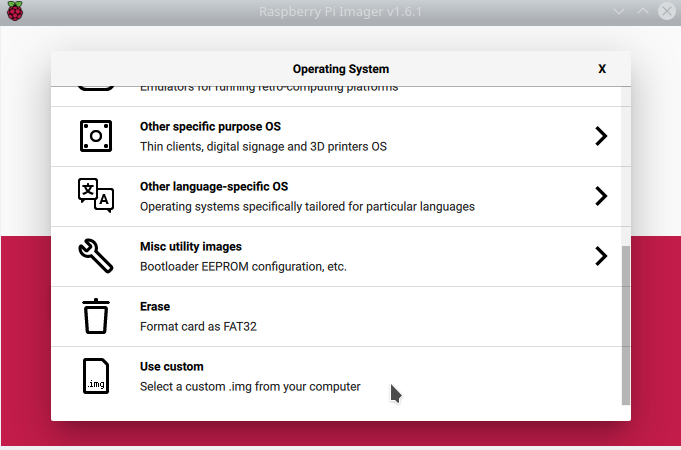
First step would be to select the OS. As there is no Kali Linux on the Raspberry Pi imager list, scroll down to the end of the list and click on Use custom.
Locate and choose the previously downloaded Kali image, select storage (if everything is right with your card, it should be on the list), and click Write.
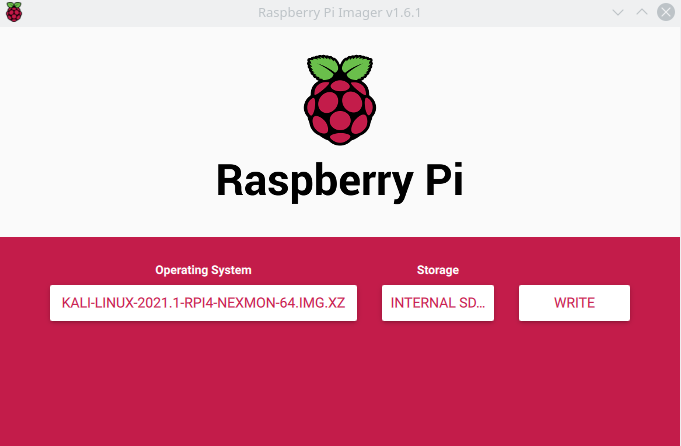
After successfull operation, everything is pretty straigtforward, put the microSD card into Raspberry, boot it and voilà!
Most common Kali Linux on Raspberry Pi problems and solutions
We’ve already covered how to install Kali Linux on Raspberry Pi 4, now is the time to customize it to your needs.
Kali Linux Raspberry Pi auto login
While this is not advisable, as this is a security risk, there are some cases when you want to have the Kali Linux auto login on Raspberry Pi. This might make sense if you have the possibility to put the device in an environment you can control. Let’s see how we can enable the auto login for Kali Linux on Raspberry Pi 4.
Before starting the configuration, we have to connect to the system. As this is the usual Kali version, only for a different device, it has standard login details.
Here is the Kali Linux Raspberry Pi default password (and username) – kali:kali.
Moving on to the subject, you have to edit the ligthdm.conf configuration file, as the Kali Linux uses LightDM as a display manager.
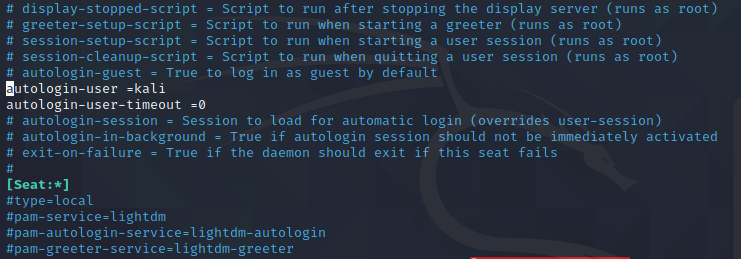
sudo nano /etc/lightdm/lightdm.confNext, there are two lines that interests us: autologin-user, and autologin-user-timeout. By editing them we will change the default functionality so that the next time we started the Kali Linux on Raspberry Pi, it would be logged in automatically without requesting a password.
Keep in mind that there are two places on the file that shall be edited. The first occurrence of the mentioned configuration settings is located in lines 83-84 of the lightdm.conf file. Uncomment both of them (by deleting the leading hashtag). Set the username of a user you want to log in with. As the default Kali user is kali, we can make the auto-login with kali user by changing the configuration to autologin-user =kali. Also, uncomment and edit the next line so that the timeout would be set to zero: autologin-user-timeout =0.
There is another place on the file that should be edited. Lines 126 and 127 contains the same values. Make sure you edited them in the same way you did it previously.
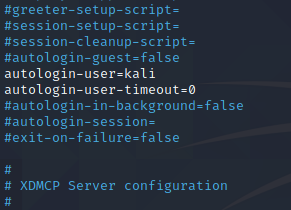
That’s it. Usually, if you want to have the auto-login for standard Kali installation, you have to additionally edit the /etc/pam.d/lightdm-autologin file and comment out this line: auth required pam_succeed_if.so user != root quiet_success. However, in our case, as Kali Linux is installed on Raspberry Pi, it does not even have this line in the config. So there is nothing to comment out.
Reboot the system and the next time you will boot up, no password will be asked.
How to make the Kali Linux Raspberry Pi headless?
The previous subsection covered how you can set the auto-login for Kali Linux. While this is one of the ways of making the installation headless, there is still another problem that it had not solved – the possibility to manage Kali remotely. In many cases purpose of going headless is that no I/O devices or graphical interface should be required. But you still want to have control over the system.
We already have the SSH for Kali Linux on Raspberry Pi enabled out-of-the-box, so there is no need to make any additional changes. Find out the IP address with ip a command on the Kali.
And connect to the system with the kali user’s password: ssh kali@YOUR-KALI-IP. Make sure you use the correct IP.
Instructions for enabling VNC on Kali Linux Raspberry Pi.
You might want to control the device from GUI. And this can be done by using VNC. Out of the box, the VNC functionality is disabled on the Kali. If you want to enable it, you have to edit the same file we’ve already customized – ligthdm.conf. Open it with a text editor:
sudo nano /etc/lightdm/lightdm.confAnd uncomment the VNC configuration parameters (except the listen-address, which is not relevant), that are located on the end of a file.
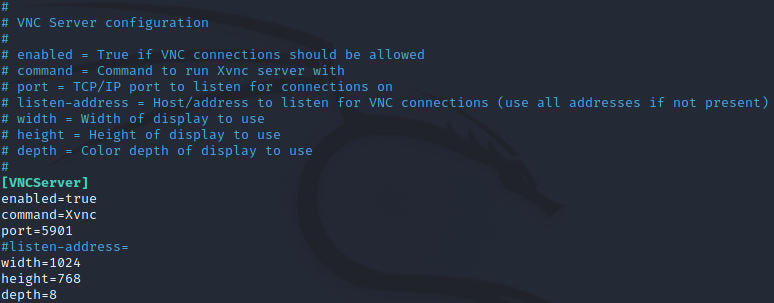
Set the enabled to true. By default, the port was set to 5900, but for this example, it was changed to port 5901.
Now you have to reload the display manager:
sudo /etc/init.d/lightdm restartFor security reasons, VNC listens on loopback. What we need to do is to use port forward via SSH. On the client machine, the one we want to use for VNC connection, execute this (make sure you did it with the correct IP):
ssh -L 5901:localhost:5901 -N -f kali@192.168.1.115Our machine will start listening on the port 5901. It will bound to remote server local port (which is 5901 as it was set previously). After this, you can start a connection with:
xtightvncviewer localhost:1 -compresslevel 9 -quality 4 -depth 8As a result, a connection will be established:
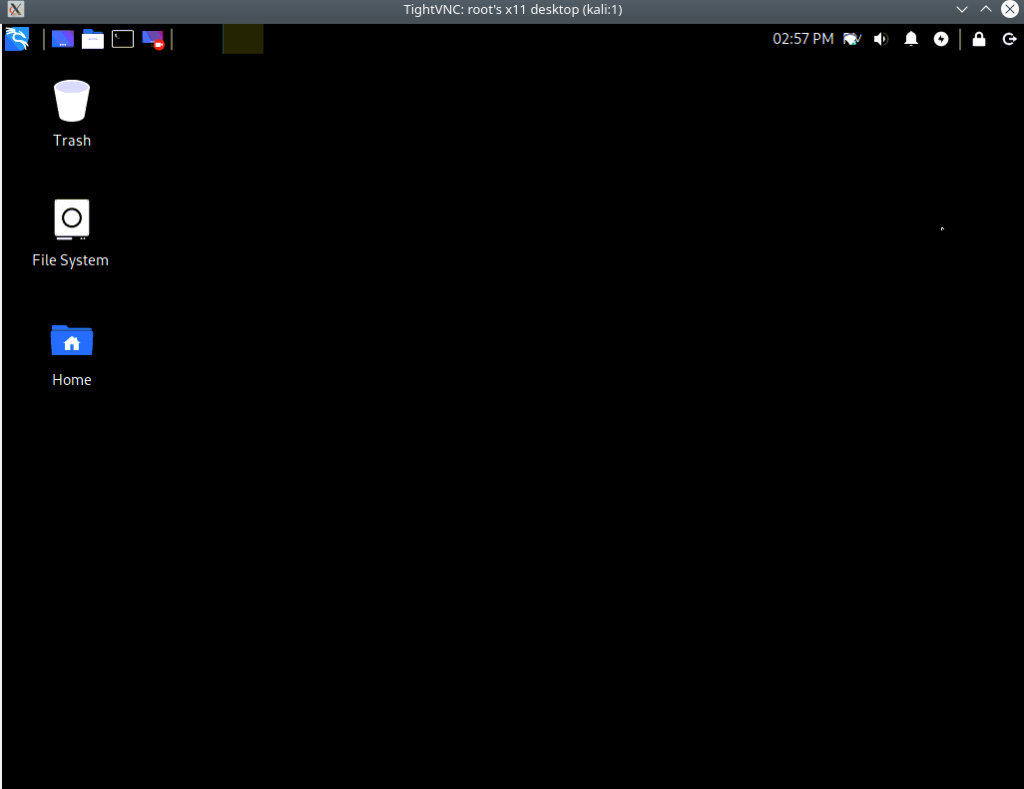
Keep in mind that if you are logged into Kali from the Raspberry Pi device itself, you should log out, if you want to connect with VNC. Otherwise, it will just won’t work.
All in all, there are a few problem with VNC:
- The connection will not be very convenient, the graphics might not be that great in our case.
- VNC is not very safe. There is a guide released by Kali creator Offensive Security, how you can make Kali accessible from a browser, without VNC.
- If you’ve configured the auto login for Kali Linux on Raspberry Pi, after starting the device, you will become automatically logged in. It will make establishing a VNC connection impossible
In summary: it is possible to use VNC, but it is not the best way for remote management. Reference the Kali guide that shows how you can control OS from browser.
Kali Linux doesn’t run on Raspberry Pi 4 8GB version
If you are owner of a Raspberry Pi 8GB version, you might face an error when running Kali Linux on 8 GB version. A common error that users face is “start4.elf: is not compatible”.
At the time of publishing this blog post, there was no official solution by Offensive Security. The only way you can solve this is to install Kali on 4 GB Raspberry Pi 4 version, put the microSD card into the device, boot it, and then you will be able to use it on the 8 GB version without any issues.
Conclusion
In this article, the main instructions covering how to install Kali on Raspberry Pi were covered. If you followed the tutorial, now you will have a portable Kali installation that can be used for further learning of penetration testing. Make sure you find a legal target you can do so, the best case would be to use a vulnerable app, such as one of the OWASP applications.

Highly passionate about cyber security (penetration testing, bug bounty hunting, cybersecurity in general), and blogging. I am experienced in vulnerability assessments, penetration testing, various security audits, had worked with various clients, most of them were in finance sector.
CompTIA Security+, CEH, CEH Practical, CEH Master, and OSCP certified.

