If you are into penetration testing there is a chance you are familiar with a website called Exploit-DB. Even though it is not the only option, it is one of the most used websites for checking if a specific version of aservice is vulnerable. Exploit-DB is created by Offensive Security. The website is pretty neat, and it arguably has a good-looking UI, but if you are working from the terminal, there are more handy options to search for exploits. And today we are going to discuss one of the alternatives for the website. Let’s see how to use Searchsploit in Kali Linux.
Table of Contents
Advantages of using the Searchsploit
Before diving into the technical details such as how to add Searchsploit to Metasploit, or how to use Searchsploit and Nmap, let’s discuss what are the advantages of this tool. At least a few things should be highlighted:
- It requires no internet to use Searchsploit. This is very handy if you are performing a penetration test in an air-gapped network that has not internet access. However, you will not be able to get the newest information about the exploits. That’s because a local database, that was received when installed the tool, is used by the tool. So you will have to update the local database once in a while.
- You can run it from a terminal. Using a website to searh for the exploits might be convienent for some. However, if you are terminal guy or girl, you might prefer having the power to hack only from terminal. There are also some cases when searching for exploits only is inconvienent. For example, Searchsploit is allowed on OSCP exam, this might be a convienient way to search for exploits. And if you are getting the CEH Practical certificate, using the browser on the given VM during the exam might be prefered, as it is known that these CEH Practical VMs might lag.
How to install Searchsploit on Ubuntu
If you are using Kali Linux, the tool is installed by default. However, if you are using a clean Linux distribution, such as Ubuntu, you will have to install it from the packages’ repository. However, the thing is that the tool is not on the official Ubuntu repositories. In order to use the Searchsploit we will have to add the Kali Linux repositories. You can do so with the following command:
sudo sh -c "echo 'deb https://http.kali.org/kali kali-rolling main non-free contrib' > /etc/apt/sources.list.d/kali.list"Let’s try to update the packages’ list:
sudo apt updateHowever, you will get an error because the signatures’ verification fails. This is fine, as we will fix it in a moment.

In order to validate the public key, we will need to have gnupg package. You will have it by default with the newest Ubuntu version, but if you do not have it, you can install it manually:
sudo apt install gnupgAfter this, let’s add the public key of the Kali Linux packages repository to your system:
wget 'https://archive.kali.org/archive-key.asc'
sudo apt-key add archive-key.asc
The key should be added.

Now you should be able to update the packages’ list without any errors:
sudo apt updatePlease do not upgrade the system yet, as very large number of packages will be installed and it will break your system.

We have to set a lower priority for the Kali Linux packages:
sudo sh -c "echo 'Package: *'>/etc/apt/preferences.d/kali.pref; echo 'Pin: release a=kali-rolling'>>/etc/apt/preferences.d/kali.pref; echo 'Pin-Priority: 50'>>/etc/apt/preferences.d/kali.pref"Update the packages’ cache again:
sudo apt updateThis time everything should be fine.

Perfect. As we are done with the formalities, we can actually install the Searchsploit:
sudo apt -y install exploitdbYou might have some trouble installing the dependencies with the previous command. If the installation hangs, you can use the aptitude tool for installing Searchploit. Firstly, install it:
sudo apt install aptitudeThen use aptitude for installing exploitdb from the Kali repository:
sudo aptitude install -t kali-rolling exploitdbIn the end, the result should be the same no matter the installation way – you should have the Searchsploit ready to use on your machine. Just execute the searchsploit in your terminal’s window and see how it goes.
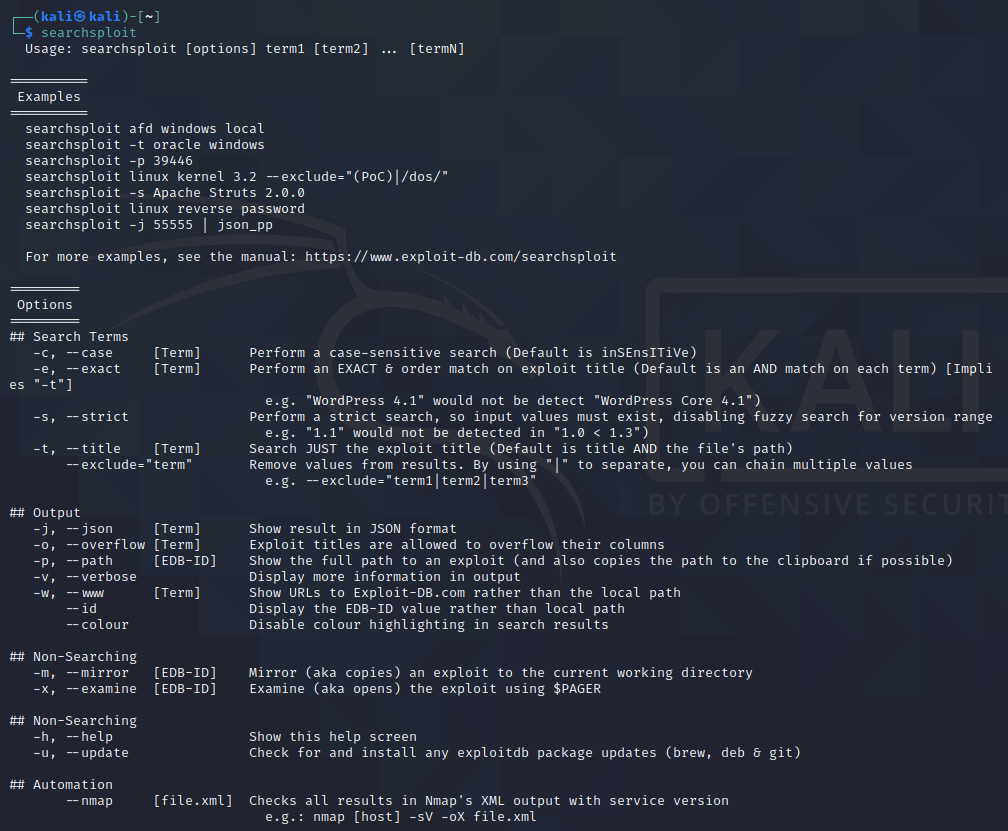
If everything went smoothly, you should get the help information.

Of course, this is only one of the options. You can always download Searchsploit from Github.
How to use Searchsploit
Using the Searchsploit is pretty straightforward. You can easily master it.
Basic usage
In order to get the help menu, just write the command searchsploit to the terminal.

If you do not have any specific needs, you don’t have to use any of the additional options. For example, if you want to search for WordPress 5.8 vulnerabilities, you can execute the following command:
searchsploit wordpress 5.8This will result in the display of exploits relevant to WordPress 5.8.

We will cover all of the options in a moment, but let’s discuss a few useful options. One of them is -m. Using this option will copy the exploit’s information to our current directory.

After this, you can easily print the contents of the text document with the cat command.
If you do not want to copy anything, there is a simpler way to review the exploit’s information with Searchsploit.
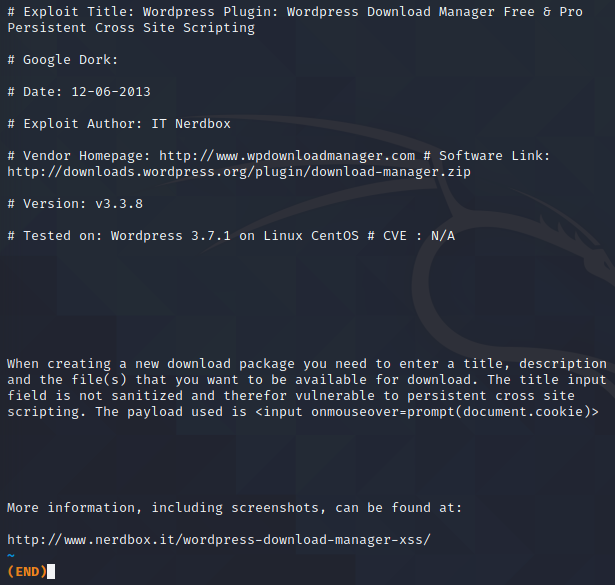
If you do want to check the information about a specific exploit, you can use the -x, or –examine option. This will print the exploit’s information to the terminal. As we made an initial search and we have the path of the exploit we want to search for (for the example let’s review the first exploit that has a path of php/webapps/30105.txt), we can execute the following command:
searchsploit -x 30105
This will show us everything that is in the 30105.txt file.

Options
There are a few options that might be handy for you, depending on your use case.
–c, –case [Term] Perform a case-sensitive search (Default is inSEnsITiVe)
Using this option performs a case-sensitive search. For example, if you do not care about the letters’ sensitivity, command “searchsploit wordpress” without this option will search for any matches of WordPress, WordPress, WorDpRess, etc. But if you will use this option and execute the following command “searchsploit -c wordpress”, it will search only for the “wordpress” occurrences.
-e, –exact [Term] Perform an EXACT & order match on exploit title (Default is an AND match on each term) [Implies “-t”]
Searchsploit with -e, or –exact option will search for an exact match. For example, command “searchsploit -e WordPress 5.8” will find exploits having WordPress 5.8 in the name, but not WordPress Core 5.8.
-s, –strict Perform a strict search, so input values must exist
Strictly searches for the occurrence. Fuzzy search for version range will be disabled with this option. It means that the provided “1.1” would not be detected in “1.0 < 1.3”).
-t, –title [Term] Search JUST the exploit title (Default is title AND the file’s path)
–exclude=”term” Remove values from results. By using “|” to separate, you can chain multiple values
e.g. –exclude=”term1|term2|term3″
Option -t makes a search only for the exploit’s title. Additionally, you can use the –exclude=”term” to remove the specific terms from the search query.
There are also a few options that will define how the results will be output to you:
-j, –json [Term] Show result in JSON format
-o, –overflow [Term] Exploit titles are allowed to overflow their columns
-p, –path [EDB-ID] Show the full path to an exploit (and also copies the path to the clipboard if possible)
-v, –verbose Display more information in output
-w, –www [Term] Show URLs to Exploit-DB.com rather than the local path
–id Display the EDB-ID value rather than local path
–colour Disable colour highlighting in search results
Other options do not affect the search for exploits directly, but might still be beneficiary:
-m, –mirror [EDB-ID] Mirror (aka copies) an exploit to the current working directory
-x, –examine [EDB-ID] Examine (aka opens) the exploit using $PAGER
-u, –update Check for and install any exploitdb package updates (brew, deb & git)
There is also an option related to using the Searchsploit with Nmap, but we will cover this in a separate subsection.
Searchsploit and Nmap
One of the advantages of the Searchsploit is that you can use it for analyzing nmap results. This saves some time during the reconnaissance stage. In order to be able to analyze the nmap results, we must save them into XML format. Firstly, make a Nmap scan that determines versions of the services:
nmap -sV 192.168.1.1 -oX results.xmlThe scan will identify versions of the open services.

After the results are saved, you can use Searchspoit with Nmap XML report to search if the services are vulnerable.
searchsploit --nmap results.xmlAs a result, relevant exploits will be found.

However, keep in mind that if Nmap finds a generic name of the service, and not a specific version of it, there will be a lot of false positives.
What’s the difference between Searchsploit and Metasploit?
There is one fundamental thing about the Searchsploit that has to be understood. It is used only for searching for the exploits.
You can’t use Searchsploit to run an exploit.
Imagine it as a search engine for exploits It means that if you want to use the exploit, you must download it from the provided source manually, or you should use Metasploit to find it and put it in action.
FInal words
Searchsploit is definitely one of the command line tools that will make your work easier in some circumstances. In case there is no possibility to use the browser and access ExploitDB, this tool becomes a must if you are auditing any target. But what is worth keeping in mind, that you must update the local exploits database once in a while, as new exploits are added to the remote database frequently.

Highly passionate about cyber security (penetration testing, bug bounty hunting, cybersecurity in general), and blogging. I am experienced in vulnerability assessments, penetration testing, various security audits, had worked with various clients, most of them were in finance sector.
CompTIA Security+, CEH, CEH Practical, CEH Master, and OSCP certified.

